
")
To replace a baseboard heating cover, turn off the heater and let it cool completely. Remove the end caps and front panel, then clean the heating element. Measure for fit, slide or snap the new cover into place, reattach the end caps, and turn the heat back on. Most jobs take under an hour with no special tools.
Why You Might Need to Replace Your Baseboard Heating Cover
Walk into any older home and you’ll likely spot them — faded, dented, or rust-streaked baseboard heating covers that have clearly seen better days. Knowing how to replace a baseboard heating cover is a surprisingly simple skill that can make a real difference in how your home looks and how well your heating system performs.
Covers aren’t just decorative. They protect the delicate metal fins inside the heater and help direct warm air evenly across the room. When a cover gets bent, corroded, or clogged with years of built-up dust, it can actually reduce your heater’s efficiency. A fresh cover fixes both problems at once — better performance and a cleaner look.
Covers with holes, rust, yellowing, or visible corrosion should be replaced for better safety and energy efficiency. Even if the damage is mostly cosmetic, a worn cover can make an otherwise tidy room feel neglected.
The good news? This is one of the most beginner-friendly home improvement projects out there. You don’t need a contractor, and in most cases you don’t even need special tools.
What You’ll Need Before You Start
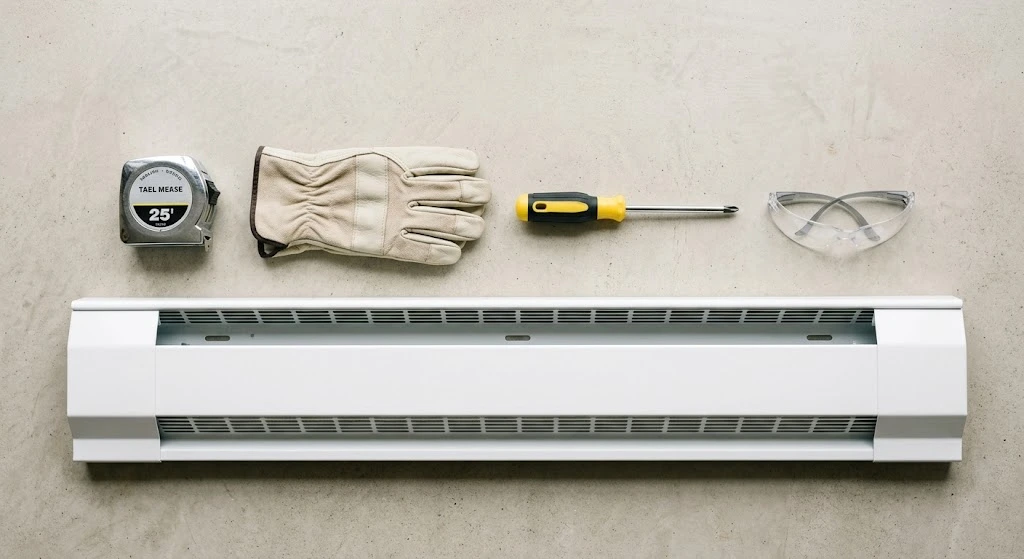
Getting organized before you start saves a lot of frustration. Here’s what to gather:
A tape measure is non-negotiable — you’ll need accurate dimensions to buy the right replacement cover. You’ll also want a pair of heavy work gloves and safety glasses. Metal baseboard heater edges can be surprisingly sharp and cause serious injury, so wearing gloves and safety glasses is strongly recommended.
Depending on your setup, you might also need a slotted screwdriver, a reciprocating saw (for older covers attached with nails), and 1¼-inch drywall screws if you’re replacing the entire back panel. For most standard slip-on cover replacements, though, your hands and a tape measure are all you really need.
As for the replacement cover itself, galvanized steel is the best material choice because of its high thermal conductivity and resistance to corrosion, making it both energy-efficient and long-lasting. Powder-coated options are also worth considering if you want something that holds its finish longer.
Most baseboard heating covers cost between $20 and $50 per linear foot, making this one of the more affordable home upgrades you can tackle yourself.
Step 1: Turn Off the Heater and Let It Cool
Safety comes first, no exceptions. Switch the baseboard heater’s circuit breaker off before you begin. Electric units can retain heat for several hours after being turned off, so wait at least two hours before touching any part of the heater.
Don’t skip this step. Working on a hot heater increases your risk of burns and could damage the new cover during installation if the metal expands unevenly.
Step 2: Measure Your Existing Cover
Before you remove anything, get your measurements down. This ensures the replacement cover you already have — or the one you’re about to buy — will actually fit.
You’ll need three key measurements: the distance from the bottom of the heater to the top of the baseboard (which should be around 5 to 6¾ inches for a standard cover), the depth from the back panel to the front of the heating tube (typically 3 inches or less), and the floor-to-top height of the baseboard (usually 7 inches or more).
Also measure the full length of the baseboard heater from end to end. If your new cover needs to be trimmed to length, mark it with a pencil before cutting.
Taking a quick photo of your existing setup before removal is also a smart move — it gives you a helpful reference when installing the new cover.
Step 3: Remove the End Caps and Front Panel
With the heater cool and your measurements confirmed, it’s time to remove the old cover. Start by taking off the end caps first — this makes the rest of the removal process easier and lets you check the full length of the heater for any damage or maintenance issues.
Once the end caps are off, remove the front panel. Most covers are held in place by clips or screws along the back edge. Carefully lift the front of the cover and remove it from the wall brackets. Some covers may need to be slid back and forth or side to side before they’ll release.
If your cover is older and was nailed or screwed directly to the wall, you may need a slotted screwdriver or reciprocating saw to free the back plate. Slide wood shims behind the back plate to create a gap between the wall and the cover, then use a reciprocating saw to cut through the nails or screws — being careful not to damage the wall surface.
Step 4: Clean the Heating Element
This step is easy to skip, but really worth doing. Use a vacuum cleaner with a brush attachment to remove dust and debris from the heating element, gently cleaning between the fins without bending or damaging them.
A clean heating element runs more efficiently, produces less of that dusty burning smell when the heat first kicks on in fall, and gives your new cover a fresh start. While you’re at it, inspect the element for signs of corrosion, bent or damaged fins, or loose wiring. If anything looks seriously wrong, consult an HVAC technician before continuing.
Step 5: Install the New Baseboard Heating Cover
Now comes the satisfying part. For most modern snap-on replacement covers, installation is straightforward.
Place the new cover in position by sliding it into the original wall brackets. Most covers slide in horizontally and then click downward over the bottom clips.
Hook the bottom of the new front cover under the bottom bracket, lift it slightly, and push the top toward the wall until the back tab snaps into place between the metal enclosure and the wall.
If you’re replacing the full enclosure — back plate and all — slide the new hangers behind the heating element, align them with the support brackets, slip the back plate into position, snap the hangers in place, and secure the back plate to the wall studs using 1¼-inch drywall screws.
For full enclosure kits, you may need to drill new holes for screws, but many modern covers are designed to slip right over the existing heater without additional drilling.
Step 6: Reattach the End Caps and Test
Replace the end caps, adjusting them as necessary to fit. Gently apply pressure to the bottom of the front cover and the end caps, listening for a slight click as everything snaps into place.
Once it’s all together, wiggle the cover gently to confirm it’s stable, well-attached, and free of any notable gaps or cracks.
Turn the heater back on and check for proper airflow and heat output. If the cover feels loose or air seems to be escaping around the edges, press it firmly back into position or adjust the end caps until everything sits flush.
How to Choose the Right Replacement Cover
Not all covers are created equal, and picking the wrong one can mean a cover that doesn’t fit or doesn’t last. Here’s how to shop smart.
Know Your Heater Type
Keep in mind whether your heater is hydronic (hot water) or electric, as these types aren’t always interchangeable when it comes to replacement covers. Check the model number on the label inside or on the side of your heater and search it online to find manufacturer-approved replacements.
Consider the Material
Steel covers — especially powder-coated or galvanized ones — offer the best combination of durability, heat conductivity, and rust resistance. Wood and plastic options exist, but they don’t handle heat as well over time and can warp or discolor. If you want something you can paint to match your trim, look for covers specifically marketed as paintable.
Get the Right Fit
Precut covers are the easiest and most budget-friendly option for DIYers. If your heater has an unusual size or an older design, look for universal-fit covers — many brands are engineered to fit roughly 95% of all hydronic baseboard heaters ever made.
Common Problems and How to Handle Them
Even a straightforward project like this can hit a snag. Here are a few situations you might run into.
The cover doesn’t snap into place. Double-check that the end caps are fully seated first — a slightly misaligned end cap can prevent the front panel from clicking in properly. Also make sure you haven’t accidentally skipped clipping the hanger brackets into position.
Your new cover is slightly too long. Most covers can be trimmed with metal snips or a hacksaw. Measure twice, score your cut line clearly, and cut slowly to keep the edge clean.
The back plate is missing or badly damaged. If the back plate can’t be used, simple wall bracket kits are available that attach directly to the wall studs and support the new cover without needing the original back plate.
You can’t find a cover that fits. If replacement covers aren’t available from the manufacturer, some brands sell fully customizable steel cover kits designed to completely enclose old baseboard heaters with a brand-new look and an extra layer of protection.
Keeping Your New Cover in Good Shape
Once your new cover is in place, a little regular maintenance will keep it looking great for years.
Vacuum the cover once a month during heating season, and wipe it down with a damp cloth when the unit is cool and fully off. Avoid harsh chemical cleaners — they can damage the finish and produce unpleasant fumes when the heater warms up.
Keep furniture and other objects away from baseboard heaters — objects placed too close are a fire hazard and can damage the cover if they tip or shift.
Annual professional HVAC inspections are also a good habit, especially for older hydronic systems. Catching a small problem early is always cheaper than dealing with a larger one later.
When to Call a Professional Instead
Most cover replacements are genuinely DIY-friendly, but there are times when it makes sense to bring in a pro.
If your heater doesn’t have a removable cover and requires dismantling the entire unit, that’s a job best left to someone with HVAC experience. Similarly, if you discover significant corrosion on the heating element, burned wiring, or any signs of a water leak in a hydronic system, stop work and call a technician before going further.
Hiring a professional for baseboard heater repair typically costs between $75 and $150 per hour in labor — a reasonable investment if the situation is more complex than a straightforward cover swap.
Final Thoughts
Replacing a baseboard heating cover is one of those projects that delivers a surprisingly big payoff for a small amount of effort. A fresh cover can make a room feel noticeably cleaner and more polished, and it helps your heating system do its job more effectively at the same time.
As long as you measure carefully, give the heater time to cool, and choose a cover that fits your specific unit, the whole job typically wraps up in under an hour. No special skills, no expensive tools — just a practical upgrade that’s well within reach for most homeowners.
So if those old, dinged-up covers have been bothering you, there’s no reason to put it off any longer. A small investment of time and about $40 in materials can genuinely transform the look of a room.