

To install central air conditioning, a licensed HVAC technician sizes the system using a Manual J load calculation, installs the indoor and outdoor units, connects refrigerant lines and ductwork, completes the electrical wiring, and tests the system. Most installations take one day and cost between $6,000 and $11,500.
If you’ve been sweating through summer with window units scattered around the house, you’re probably thinking it’s finally time to learn how to install central air conditioning. The good news? The process is well-defined and, with the right professional, usually completed in a single day. Whether you’re upgrading an older home, adding cooling to a new build, or replacing a worn-out system, this guide walks you through every stage — so you know exactly what to expect and how to make smart decisions along the way.
What Is Central Air Conditioning and How Does It Work?
Before diving into the installation process, it helps to understand what you’re actually installing.
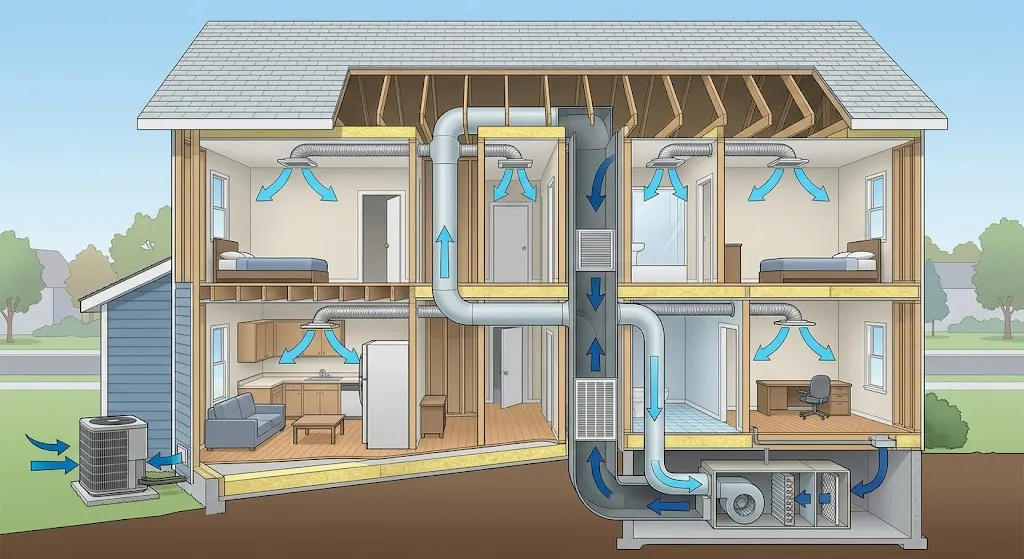
A central air conditioning system cools your entire home from one central location and distributes that cool air through a network of ducts. It pulls warm air from your rooms, passes it over a cold evaporator coil, and pushes the cooled air back through supply vents in each room. At the same time, it removes humidity — which is a big reason why central AC feels so much more comfortable than a window unit on a muggy afternoon.
Central air conditioners circulate cool air through a system of supply and return ducts. Supply ducts and registers deliver cooled air to your home, while the cooled air becomes warmer as it circulates and is then pulled back to the central air conditioner through return ducts.
Unlike window units that only cool single rooms, central AC provides whole-home comfort with even temperatures, and modern systems also improve indoor air quality by filtering allergens and removing excess humidity.
The Two Main Types of Central AC Systems
Not every home gets the same type of system. The right choice depends on your home’s layout, existing equipment, and budget.
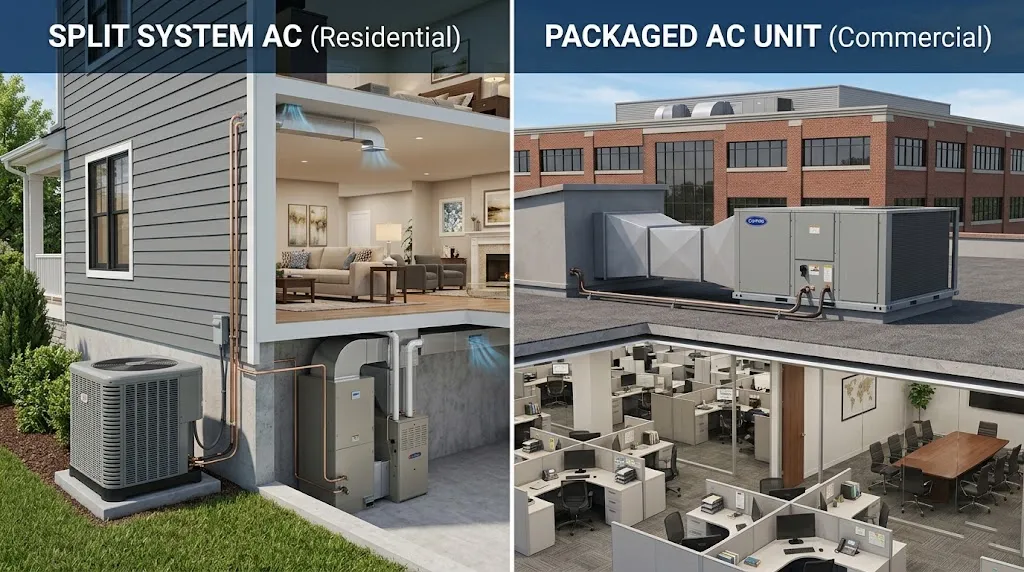
Split Systems
Split-system central air conditioners have an outdoor unit containing the heat exchanger, fan, and compressor, and an indoor unit with the heat exchanger and blower. This is the most common setup in American homes. If you already have a furnace, a split system simply adds a cooling component that works alongside it.
Packaged Units
In packaged central air conditioners, the heat exchanger, compressor, fan, and blower are all located in one cabinet, typically placed on a roof or concrete slab next to the house’s foundation. Packaged units often include electric heating coils or a natural gas furnace, eliminating the need for a separate furnace. These are more common in commercial settings but do show up in some residential installations.
For most homeowners, a split system is the right call. Your HVAC contractor will confirm which type suits your home after evaluating your existing setup.
Why Central Air Conditioning Installation Is Not a DIY Job
Here’s something worth saying upfront: central AC installation is not a weekend project. It involves refrigerant handling, high-voltage electrical work, and precise system calibration — all of which require professional licensing and specialized tools.
The process involves handling regulated refrigerants, performing precise load calculations to size the system correctly, and complex electrical work that can be dangerous. An improperly sized or installed system leads to inefficiency, higher bills, and a shorter lifespan.
Central air conditioners live on dedicated circuits. Units 3 tons and up usually demand 240V, 30–40 amp breakers. Use copper conductors sized per NEC specifications and install a fusible disconnect within sight of the condenser so technicians can cut power while servicing.
There’s also the matter of refrigerant. By law, only EPA-certified technicians can handle refrigerants. Attempting this on your own isn’t just risky — it’s illegal.
That said, being an informed homeowner is your best protection against overpaying or getting a sloppy install. So let’s walk through every step together.
Step 1: Get Your Home Assessed
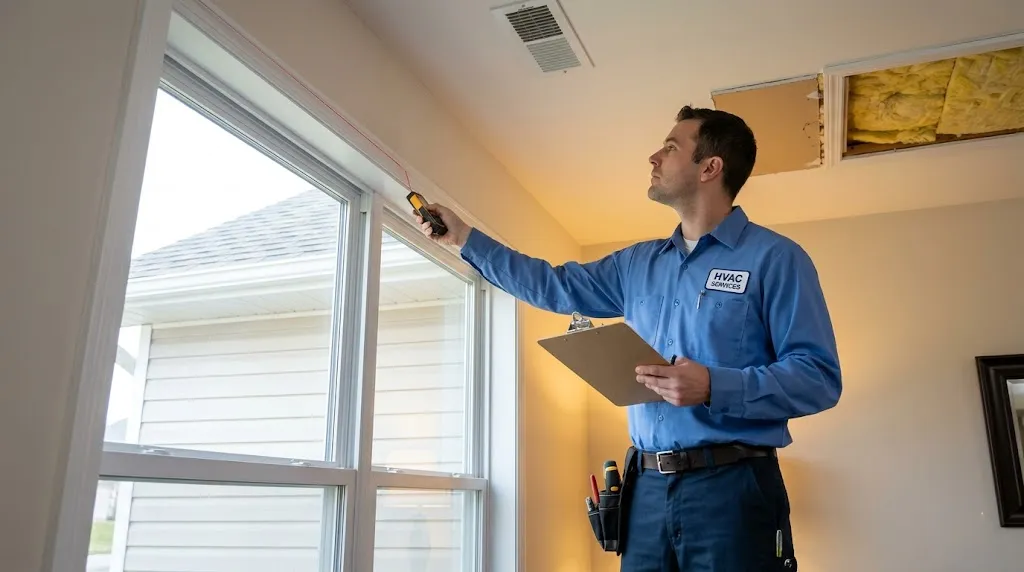
The first thing a good HVAC contractor will do is assess your home — not just measure it, but really evaluate it.
Start by examining your current air conditioning system’s performance and age. Older systems typically over 10 years old are prime candidates for replacement, especially if they require frequent repairs or struggle to maintain consistent temperatures.
They’ll look at your insulation levels, window types, ceiling height, sun exposure, and the number of people who live in the home. All of this data feeds into the most important calculation in the entire process.
Step 2: Size the System Correctly with a Manual J Calculation
Sizing is where a lot of installs go wrong — and it’s also where you can spot a contractor cutting corners.
To accurately size your central AC unit, a contractor will complete an Air Conditioning Contractors of America Manual J load calculation. This process calculates your home’s heat gain and considers factors such as insulation levels, window types and orientations, and the number of occupants.
Central AC units are rated by tonnage and BTUs. One ton equals 12,000 BTUs, and the right size depends on your home’s heat gain calculation. Undersized units will struggle to cool your home, resulting in excessive wear and higher energy costs. Oversized units can also create comfort issues.
Think of it this way: a unit that’s too big cools the room so fast that it shuts off before it can pull humidity out of the air. You end up with a house that feels cold but still damp and uncomfortable. A unit that’s too large will cool the house too fast and shut down before completing a full cycle — and a frozen evaporator coil won’t allow air to circulate, meaning an oversized air conditioner can actually be less effective than an undersized one.
Any contractor who offers to size your system without performing a Manual J calculation is a red flag. Walk away.
Step 3: Choose the Right AC Unit
Once you know your home’s cooling requirements, it’s time to pick the actual unit.
An air conditioner’s efficiency is rated using the seasonal energy efficiency ratio, or SEER. Efficiency is measured by how many BTUs the system can remove for each watt of electricity consumed. The higher a unit’s SEER number, the more efficient it is overall. A SEER of at least 13 is required by federal law.
A higher SEER rating means lower monthly energy bills, though it often means a higher upfront cost. For most homeowners, landing somewhere in the SEER 16–18 range hits a good balance between efficiency and price.
Heat pumps are popular partly owing to a tax break offered by the federal government to encourage energy-efficient central air systems. If you’re open to a heat pump instead of a traditional AC, it’s worth asking your contractor about the available federal tax credits, which can meaningfully offset the installation cost.
Step 4: Evaluate and Prepare the Ductwork
If your home already has ductwork, it may just need inspection and sealing. If it doesn’t, this is where costs start to climb.
A critical step is sealing joints with mastic to prevent air leaks, as an average home can lose 25 percent of its conditioned air through leaky ducts. Insulating ducts in unconditioned spaces is also essential to maintain temperature and prevent condensation.
A proper installation installs ductwork within conditioned space whenever possible, not in unconditioned spaces like attics or garages, and seals all ducts with duct mastic and properly insulates them.
If your home has no existing ducts, work with your contractor to find ways to hide them in closets or soffits to avoid extensive drywall repairs. It adds time and cost, but hiding ducts well preserves your home’s appearance and long-term value.
Step 5: Install the Outdoor Condenser Unit
With sizing done, permits pulled, and ductwork sorted, the physical installation begins.
Locate the condensing unit where its noise won’t disturb you or your neighbors and where airflow won’t be obstructed. The outdoor unit needs clearance on all sides — at least two feet of open space around it — to breathe properly and run efficiently.
The installer places the condenser on a level concrete pad or pre-formed plastic base. Getting this right matters because the unit can’t shift or tilt once refrigerant lines are connected. If the ground is uneven, your contractor will level it before setting the pad.
Step 6: Install the Indoor Air Handler and Evaporator Coil
The indoor unit — often called the air handler — is installed inside your home, typically in a utility closet, attic, or mechanical room. It connects to your existing ductwork and sits above or alongside your furnace if you have one.
The evaporator coil, which sits inside the air handler, is where the actual cooling happens. Warm air from your home passes over this coil, heat is absorbed into the refrigerant, and cooled air is pushed back through the ducts.
The installation also ensures enough supply and return air registers for efficient air distribution throughout the home. Too few return vents can create pressure imbalances that make some rooms feel stuffy and others feel too cold.
Step 7: Connect the Refrigerant Lines
Copper refrigerant lines run between the outdoor condenser and the indoor evaporator coil. These carry the refrigerant that makes the whole cooling process work.
This is a step that absolutely requires an EPA-certified technician. Refrigerant leaks reduce cooling and harm the environment, so professionals pressure-test lines to ensure a tight seal.
After the lines are connected, the technician evacuates the system — essentially removing all air and moisture — before charging it with refrigerant. A proper installation verifies the correct refrigerant charge and airflow rate as specified by the manufacturer. Getting this wrong by even a small margin hurts both efficiency and equipment lifespan.
Step 8: Complete the Electrical Hookups
Your new system needs its own dedicated electrical circuit — it can’t share with other appliances.
Do not backfeed off a clothes-dryer circuit or share neutrals with lighting — these are common DIY shortcuts that trigger nuisance trips every storm. Ground both indoor and outdoor cabinets to the service ground rod, and label the breaker clearly for future reference.
Older homes sometimes need an electrical panel upgrade before a new AC system can be added. This is an added cost to budget for, but it’s a safety requirement, not an optional upgrade.
Step 9: Install the Thermostat
Centrally locate the thermostat away from heat sources like windows or supply registers. Placing it in the wrong spot — near a sunny window or above a heating vent — gives it false readings, causing the system to cycle on and off at the wrong times and wasting energy.
The thermostat installation step will be more complex if you need multiple thermostats or want to install a smart thermostat. Smart thermostats are well worth the upgrade. They learn your schedule, adjust automatically, and give you remote control through your phone — which can shave a meaningful amount off your monthly energy bill.
Step 10: Set Up the Condensate Drain Line
As your AC cools the air, it also pulls moisture out of it. That moisture has to go somewhere.
The condensate drain line runs from the evaporator coil to a floor drain or condensate pump. It redirects moisture away from your home while the air conditioner is running. A clogged or improperly routed drain line can cause water to back up into your home — a problem that’s easy to prevent but messy and expensive when it happens.
Step 11: Test the System
Your AC tech will run air through the system for around 20 minutes. The air may be warm at first, but it eventually begins to cool as intended. During this test, the technician inspects the system’s operation, thermostat readings, and more to confirm that the unit is working normally.
A thorough test run also checks airflow at every vent, verifies that the condensate drain is flowing properly, and confirms that the electrical connections are solid. Don’t let a contractor skip this step.
How Much Does It Cost to Install Central Air Conditioning?
Installing central air conditioning typically costs between $6,000 and $11,500, including both equipment and labor. Total cost depends on factors such as your home’s size, the system’s efficiency rating, and whether existing ductwork can be used or needs modification.
Homes without existing ducts often face the steepest costs. Older homes may also need electrical panel upgrades to support the new system. Get at least three written quotes from licensed contractors, and make sure each one includes a Manual J calculation — not just a rough square-footage estimate.
How to Keep Your Central AC Running Efficiently
A new system is an investment. A little maintenance goes a long way toward protecting it.
Monthly: replace or wash filters. Each spring, hose off condenser fins from the inside out and straighten any bent fins. In summer, check system pressures and call a technician if anything seems off. In fall, vacuum blower wheel blades, since dust reduces airflow and strains the motor.
Schedule annual professional service to inspect components and catch issues early. Keep the outdoor unit clear of debris and vegetation for proper airflow, and replace air filters regularly to maintain airflow and indoor air quality.
A well-maintained system should last around 15 years. Skip the maintenance and that lifespan can drop significantly — along with its efficiency and your comfort.
Conclusion
Learning how to install central air conditioning means understanding that it’s a coordinated process with several moving parts — literally. From the Manual J sizing calculation to the final system test, each step builds on the last. Getting it right the first time is what separates a comfortable, efficient home from one that costs too much to run and breaks down too soon.
The best thing you can do as a homeowner is go into the process informed. Know what to ask, know what red flags look like, and hire a licensed HVAC professional who takes the time to do it properly. A good installation isn’t just about staying cool this summer — it’s about comfort for the next 15 years.