

| How To Install Radiant Heat
To install radiant heat, choose between electric mats or hydronic tubing, prepare your subfloor, lay the system according to the manufacturer’s layout plan, connect to a thermostat and power or boiler source, then cover with flooring. Always test the system before finishing the floor. |
Cold floors are one of the most common complaints homeowners have during winter. You crank the thermostat, warm air rises to the ceiling, and your feet still freeze on the tile. Learning how to install radiant heat solves this problem at the source. Instead of blowing warm air around a room, radiant systems heat the floor itself, which then warms everything above it, including you.
According to the Radiant Professionals Alliance, radiant floor heating is now used in approximately 30% of new residential construction in the United States, up from under 10% two decades ago. Homeowners report energy savings of 15% to 30% compared to forced-air systems, and satisfaction rates are consistently high. Once you understand the two main system types and the installation process, this is a project many skilled DIYers can tackle.
This guide covers the two types of radiant heating systems, the tools and materials you need, and a detailed walk-through of the installation process for both electric and hydronic systems. You will also find a comparison table, cost estimates, and answers to the most common questions homeowners ask before starting.
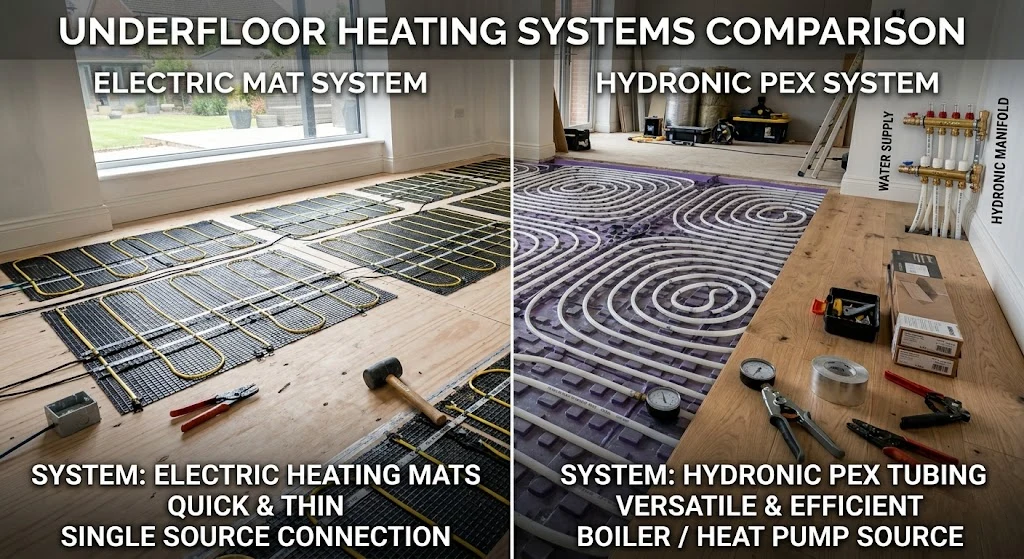
Electric vs. Hydronic: Pick the Right System
Before you buy a single product, you need to choose between the two main types. The right choice depends on your budget, your project size, and whether you are renovating a single room or building a new home.
Electric Radiant Floor Heating
Electric systems use thin resistance cables or pre-made heating mats embedded in or under your flooring. They are the more practical choice for retrofitting a bathroom, kitchen, or bedroom. Installation is faster, and most competent DIYers can complete a room in a weekend. The main downside is operating cost. Running electric heat continuously in large spaces gets expensive.
Hydronic Radiant Floor Heating
Hydronic systems circulate hot water through PEX tubing embedded in a concrete slab or below a wood subfloor. They cost more upfront but are significantly cheaper to run, especially when connected to a gas boiler or heat pump. Whole-home hydronic systems are best planned during new construction or a major renovation. Retrofitting them into an existing home requires more structural work.
Here is a direct comparison to help you decide:
| Factor | Electric Radiant | Hydronic Radiant |
| Upfront Cost | $8–$15 per sq ft | $15–$30 per sq ft |
| Operating Cost | Higher (electricity) | Lower (water/gas) |
| Best For | Single rooms, retrofits | Whole-home, new builds |
| DIY Difficulty | Moderate | Advanced |
| Heat-Up Time | 30–60 minutes | Several hours |
| Lifespan | 25+ years | 20–35 years |
Tools and Materials You Need
Gathering everything before you start prevents costly delays mid-project. The exact list varies by system type, but these are the core items for both:
- Heating element: electric mat or cable rolls, or PEX tubing (hydronic)
- Thermostat: programmable smart thermostat with floor sensor
- Insulation board: rigid foam insulation to prevent heat loss downward
- Self-leveling compound: to embed electric cables in mortar bed
- Ohm meter: to test electric cables before and after installation
- Staple gun or cable clips: to secure tubing or cables to subfloor
- Floor sensor wire: typically included with thermostat kit
For hydronic systems, add a circulator pump, manifold, boiler or water heater connection fittings, and PEX crimping tools. If you are not comfortable with plumbing connections, hire a licensed plumber for that phase.
How To Install Radiant Heat: Step by Step
The process below covers electric mat installation, the most common DIY approach. Hydronic installation follows the same principles for subfloor prep but differs significantly at the tubing and plumbing stages.
Step 1: Prepare the Subfloor
Start with a clean, flat, and dry subfloor. Any debris, high spots, or moisture problems will cause issues later. Sand down raised areas and fill low spots with floor-leveling compound. Check for moisture with a moisture meter. Readings above 3% in wood subfloors mean you need to address the source before proceeding.
Lay rigid foam insulation board over the subfloor first. This step is critical. Without insulation, a significant portion of your heat will travel downward into the floor structure instead of upward into the room. A 1/4-inch to 1/2-inch foam board with a reflective facing is sufficient in most cases.
Step 2: Plan Your Cable or Mat Layout
Most electric mat manufacturers provide a layout tool or grid system. Measure the room and mark the heated area. Do not place heating elements under permanent fixtures like cabinets, toilets, or islands. These trap heat and can damage the system.
Keep cables at least 2 inches from walls and 4 inches from each other to prevent overheating. The thermostat sensor wire should run between two cable runs, positioned toward the center of the room. Tape it in place.
Step 3: Install the Heating Element
For electric mats, roll them out across the insulation according to your layout plan. Mats come with adhesive backing in many cases. Cut the mesh between rows to change direction, but never cut through the cable itself. Secure loose sections with tape.
For electric cable rolls, secure the cable to the insulation board using cable staples or clips. Maintain consistent spacing as you work across the floor. Run the cold lead (the end without a heating element) back to the thermostat location.
Test resistance with an ohm meter at this stage. Compare the reading to the value printed on the cable packaging. A reading that differs by more than 10% signals a problem you need to fix before continuing.
Step 4: Embed in Mortar and Protect the Cable
Mix self-leveling compound or thin-set mortar according to the product instructions. Pour it over the cables or mats, working it into all gaps. Aim for a thickness of at least 3/8 inch above the top of the cable. Let it cure fully before any foot traffic, typically 24 to 48 hours.
Do not turn on the system during curing. Premature heating can crack the compound and damage the cables.
Step 5: Connect to the Thermostat
Route the power leads and sensor wire to your thermostat junction box. Most electric radiant systems run on 120V or 240V circuits. A 240V system is more energy-efficient for larger areas. If you need a new dedicated circuit, hire a licensed electrician.
Wire the thermostat according to the manufacturer’s diagram. Programmable thermostats with floor and air sensors offer the best energy management. Set a maximum floor temperature limit, usually 85 degrees Fahrenheit for tile and 80 degrees for wood flooring, to protect the material.
Step 6: Install Your Finish Flooring
Once the mortar bed is fully cured and the thermostat is wired, install your finish flooring. Tile, stone, and luxury vinyl plank work best with radiant systems because they conduct heat well. Hardwood is compatible but requires careful moisture control and a maximum floor temperature setting.
Wait at least 3 days after finishing the floor before running the system at full heat. Gradually increase the temperature over several days to let adhesives and materials acclimate.
Common Mistakes That Cost You Money
Skipping the insulation layer is the most expensive mistake you can make. Without it, you heat the subfloor and the room below instead of the room you want to warm. Studies from the Building Science Corporation show that proper floor insulation can improve system efficiency by up to 40%.
Installing cable under fixed cabinetry is the second most common error. Always finalize your kitchen layout before installing radiant heat. Removing tiles to fix trapped cable voids warranties and wastes significant labor.
Finally, never skip the ohm meter test. A cracked cable hidden under mortar is one of the most frustrating and expensive repairs in home improvement. Test before embedding, test after embedding, and test again after the flooring is installed.
Hydronic Systems: What Changes
If you choose a hydronic system, the subfloor prep and insulation steps are identical. The key differences start at the tubing installation stage.
PEX tubing is stapled to the insulation board in a serpentine or spiral pattern. Spacing of 6 to 9 inches between runs is standard. The tubing connects to a manifold, which distributes flow from your heat source to each zone in the home.
A licensed plumber should handle the boiler connection and pressure testing. The PEX layout itself is something experienced DIYers can do, but the mechanical connections and system balancing require professional expertise. Budget $3,000 to $8,000 for the mechanical components alone in a whole-home system.
“Hydronic radiant heat is the gold standard for whole-home comfort, but it demands precise installation,” says Mark Simonsen, a mechanical engineer and radiant heating consultant based in Minnesota. “Cutting corners on the manifold or zone valves leads to uneven heating and expensive call-backs.”
Frequently Asked Questions
Can I install radiant heat myself?
Yes, for electric systems. Most homeowners with basic DIY skills can install electric mats in a single room over a weekend. Hydronic systems require plumbing expertise and are better suited to professionals.
How long does radiant floor heat take to warm up?
Electric systems reach full temperature in 30 to 60 minutes. Hydronic systems take 2 to 8 hours depending on floor mass and boiler capacity. Programmable thermostats solve this by pre-heating before you wake up.
What flooring works best with radiant heat?
Tile and stone conduct heat best. Luxury vinyl plank and engineered hardwood also work well. Thick carpet insulates the floor and reduces efficiency significantly.
How much does it cost to run radiant floor heat?
Electric systems cost roughly $0.50 to $1.00 per square foot per month at average utility rates. Hydronic systems run 30% to 50% cheaper monthly but have higher upfront installation costs.
Does radiant heat work under hardwood floors?
Yes, with precautions. Use engineered hardwood rated for radiant systems, keep the floor temperature below 80 degrees Fahrenheit, and allow the wood to acclimate properly before and after installation.
Your Warm Floor Is Worth the Work
Installing radiant floor heat requires careful planning, the right materials, and attention to detail during every phase. Start by choosing the correct system type for your project. Prep the subfloor thoroughly. Test your cables before burying them. Connect to a smart thermostat. And take your time with the finish flooring installation. Follow these steps and you will have a heating system that lasts 25 years or more while keeping your energy bills in check. How to install radiant heat is a skill that pays off every single winter.
Comfort at the floor level changes how a room feels completely. Forced-air heating heats air. Radiant heating heats you. If you are tired of cold floors and high heating bills, this project is worth every hour of work. Start with one room, get comfortable with the process, and expand from there. Your feet will thank you the first cold morning after your system is live.