
")
How to Install a Mini-Split AC Heat Pump To install a mini-split AC heat pump, mount the indoor air handler high on an interior wall, drill a passage hole through the exterior wall, run the line set to the outdoor condenser, connect the refrigerant lines and wiring, vacuum the lines, then power the system on and test both heating and cooling modes.
If you want to heat and cool your home without tearing into walls to add ductwork, learning how to install a mini-split AC heat pump might be the best decision you make this year. These compact, energy-efficient systems have exploded in popularity — and for good reason. They work year-round, give you zone-by-zone control, and can cut your energy bills significantly compared to older systems.
This guide walks you through the full installation process in plain language, from picking the right spot for your units to flipping the power on for the first time.
What Is a Mini-Split AC Heat Pump, and Why Install One?
A mini-split system has two main parts: an indoor air handler that mounts on your wall and an outdoor compressor unit. The two are connected by a line set, which includes refrigerant lines, electrical wiring, and a condensate drain.
Unlike a window unit, it doesn’t block your view or your fresh air. Unlike central HVAC, it doesn’t require a network of ducts running through your ceiling and walls. These units work great in homes, offices, or additions where ductwork is not an option.
They’re also perfect for room additions, garages, older homes, or anywhere you want independent temperature control without expensive duct installation.
The big question most people ask is: can I install one myself? The honest answer is — it depends on your skill level and your local codes.
DIY vs. Professional Installation: What You Need to Know
While the mechanical installation is straightforward for someone with good DIY skills, the electrical work and refrigerant handling require careful attention — and sometimes professional help. Some jurisdictions require licensed technicians for certain aspects, particularly electrical connections and refrigerant work.
Some brands have made this easier than others. DIY-friendly systems like MrCool Direct come pre-charged with Quick Connect line sets, which eliminate the need for a vacuum pump and refrigerant handling. That’s a game-changer for homeowners who want to skip the most technical part of the job.
Even someone fully committed to a DIY installation may want to consult an electrician before starting, to ensure the electrical system meets all requirements and runs safely.
Before you pick up a drill, check your local building department. Most municipalities require permits for HVAC installations, and skipping permits can risk fines, insurance complications, and resale problems down the line.
Tools and Materials You’ll Need
Getting your tools together before you start saves a lot of frustration. Here’s what a standard installation calls for.
You’ll need a drill with various bits including a 3.5-inch hole saw, a tape measure, a level, a torque wrench for refrigerant connections, a vacuum pump and gauge set to remove air and moisture from refrigerant lines, and line covers to protect and conceal the line set.
If you go with a pre-charged DIY system, you can skip the vacuum pump and manifold gauge set entirely. Those systems only require a drill, a hole saw, a screwdriver, a wrench, a level, and a measuring tape.
Step 1: Choose the Right Location for Both Units
Location matters more than most people think. A poor placement leads to uneven temperatures, reduced efficiency, and higher energy bills.
For the indoor unit, select a spot high on a wall where air can flow freely, and avoid placing it above heat sources or behind obstacles. The indoor unit needs at least 6 inches of clearance around it for proper airflow.
Also keep the indoor unit away from fluorescent lights, as they can interfere with the remote control. Make sure the location allows easy access to the air filter, which sits at the top of the unit.
For the outdoor condenser, place it in a shaded location outside where it can have at least 4 inches of clearance behind it and 20 inches of clearance above it and in front of it.
When possible, plan to install the indoor unit on an interior surface of an exterior wall. This keeps the line set run short and clean.
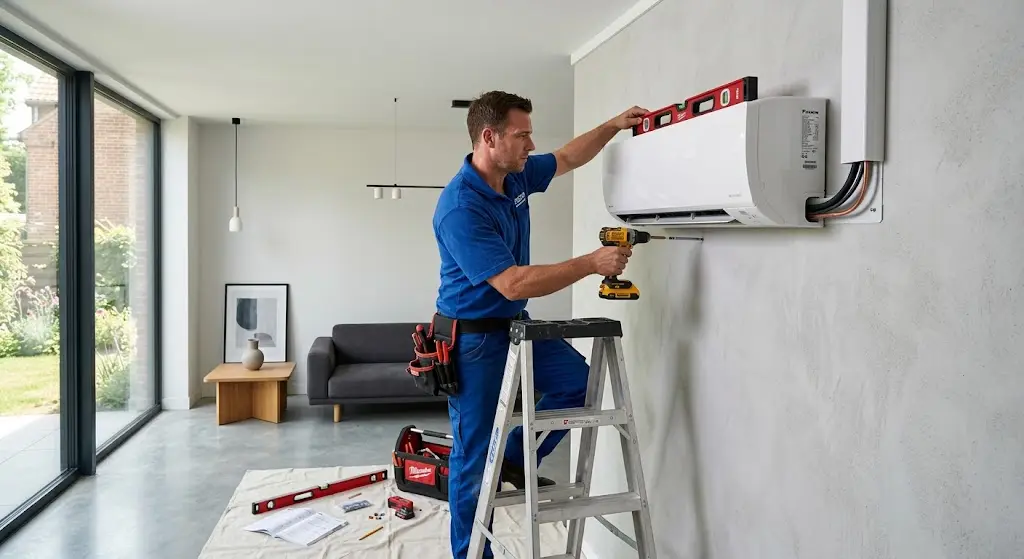
Step 2: Mount the Indoor Air Handler
Use a stud finder to locate wall studs, confirm their positions, then mount the indoor unit’s wall plate to the studs using weight-bearing fasteners with large heads — lags with washers or screws with washers work well here.
Use a level to make sure the plate sits perfectly straight. Even a slight tilt can cause condensation to drain the wrong way, which leads to dripping water inside your home.
Once the mounting plate is secure, hang the air handler onto it temporarily while you work on the wall penetration.
Step 3: Drill the Wall Passage
Using a hole saw, drill through the exterior wall at a slight downward angle, adjacent to the lower right-hand side of the mounting plate. The downward angle is important — it ensures the drain line naturally flows water away from the unit and out of your home.
Route the line set, which includes the refrigerant lines, drain hose, and electrical wiring, through the wall hole, then connect the lines to the indoor unit and make sure they’re properly insulated to prevent energy loss.
After the lines are through, seal around the hole with foam or weatherproof sealant. Skipping the sealant can lead to air leaks, moisture problems, and even pest entry points.
Step 4: Install the Outdoor Condenser
Secure the outdoor condenser on a concrete pad or wall-mounted brackets, and keep it at least 12 inches away from walls for proper airflow. The unit needs a stable, level base — vibration from an uneven surface wears out components faster and creates unnecessary noise.
In areas with heavy snow, raise the unit on a bracket or elevated pad so it stays above typical snowfall levels. This keeps the unit working efficiently during cold snaps when you need heating the most.
Connect the refrigerant lines and communication wiring from the indoor unit to the outdoor condenser. Follow the manufacturer’s wiring diagram exactly. Taking photos before disconnecting anything and using a multimeter to identify wires if necessary can save you a lot of confusion.
Step 5: Vacuum the Refrigerant Lines
This is the step that separates a standard installation from a DIY pre-charged system. If your unit didn’t come pre-charged, vacuuming the lines is non-negotiable.
Attach the vacuum pump to the service port and allow the vacuum gauge to reach roughly 200 microns. Then shut the valve on the valve core removal tool and turn off the vacuum pump.
Wait at least ten minutes with the pump isolated to see if the micron level rises — this is called the “Ten Minute Standing Vacuum Test.” If the vacuum level continually rises, there is a leak. If it rises and then plateaus, there may be water in the system.
If everything stays stable, you’re clear to open the service valves and release refrigerant into the lines.
Many DIYers handle all the mounting and line-running themselves but hire an HVAC tech just for this single step. That typically costs between $150 and $300 and is a reasonable middle ground.
Step 6: Handle the Electrical Connection
The mini-split needs a dedicated circuit from your electrical panel. In the U.S., electrical codes require an AC disconnect switch within sight of the outdoor unit.
Most mini-splits run on a 220–240V circuit. The breaker size depends on the unit’s specifications, so always check the manual before touching anything in your panel. If you’re not confident working in your electrical panel, this is the right time to bring in a licensed electrician.
Proper wiring isn’t just about the unit working — it’s about your home staying safe.
Step 7: Test the System
Once everything is connected, restore power and run the system in both cooling and heating modes.
The system should be ready to heat and cool after a final check with gauge manifold and vacuum pump to verify there are no leaks and moisture has been removed from the lines.
Check that air is flowing freely from the indoor unit, the outdoor fan is spinning, and the condensate drain is working. Pour a cup of water into the drain pan while the system is off — water should drain quickly and completely.
If temperatures don’t reach the setpoint within a reasonable time, double-check that the air filters are clean, clearances are adequate around both units, and all connections are tight.
Common Mistakes to Avoid
Even experienced DIYers run into problems on their first mini-split installation. A few of the most common ones are worth knowing ahead of time.
Choosing the wrong BTU capacity for your space is one of the most costly errors. Poor clearance around both units restricts airflow. Failing to seal the wall hole leads to air leaks and moisture issues.
Incorrect positioning of indoor and outdoor units affects system efficiency and airflow, so take your time with placement before committing to a spot.
Also don’t overlook the drain line. Proper condensate drainage is crucial for preventing water damage and mold growth — plan for a gravity-fed drain line, or consider installing a condensate pump if necessary.
How to Keep Your Mini-Split Running Well
Installation is just the beginning. Keeping the system maintained means it runs efficiently for years without surprise repair bills.
Clean or replace the air filters monthly, and wipe down the indoor unit’s exterior with a damp cloth periodically. Periodically clean the indoor and outdoor coils to remove dust and debris, inspect refrigerant lines and connections for any signs of leaks, and ensure the condensate drain line stays clear.
An annual professional check-up is also a smart move, even if you did the installation yourself. A technician can catch small refrigerant issues or electrical wear before they turn into big, expensive problems.
Final Thoughts
Installing a mini-split AC heat pump is one of the most rewarding home improvement projects you can take on. You get precise comfort control, lower energy bills, and a system that works in every season. Whether you go fully DIY with a pre-charged kit or handle most of the work and bring in a pro for the refrigerant step, the result is the same — a comfortable home on your own terms.
Take your time with placement, don’t skip the permits, and follow the manufacturer’s wiring diagrams closely. Do those things right, and your mini-split will reward you with years of reliable heating and cooling.