

To install a pull-out kitchen shelf, measure your cabinet interior, subtract 1 inch from the width for the slides, mount the drawer slides level inside the cabinet, build or buy a shelf box, attach the rail sections to the shelf, then slide it in and test the motion.
You open the cabinet door, crouch down, and start pulling things out just to reach the pasta in the back. Sound familiar? That’s the exact problem a pull-out kitchen shelf solves. It works like a shallow drawer inside your existing cabinet, bringing everything forward so you can see and grab what you need without digging around.
The good news is that installing one is a real weekend project. You don’t need advanced woodworking skills or a shop full of tools. With the right measurements and a little patience, you can add pull-out shelves to every base cabinet in your kitchen.
What You’ll Need Before You Start

Getting your materials together before you begin saves a lot of time. You’ll need a tape measure, pencil, level, power drill with bits, and a screwdriver. A circular saw or miter saw helps if you’re cutting your own shelf box from plywood, but many hardware stores will cut wood to your dimensions for free.
For materials, pick up a pair of full-extension drawer slides — 22-inch slides work well for most standard base cabinets. You’ll also want 3/4-inch plywood for the shelf bottom, pine 1×3 boards for the frame sides, wood glue, 1 5/8-inch drywall screws, and wood screws that match your drawer slide kit. If you’re going the pre-built route, pull-out shelf kits are available at most home centers and come with everything included.
Full-extension slides are worth the few extra dollars. They let the shelf travel the full depth of the cabinet, so nothing stays hidden in the back.
How to Measure Your Cabinet Correctly
Good measurements are everything here. A shelf that’s even a quarter inch too wide won’t fit through the cabinet opening, and one that’s too narrow will wobble on the slides.
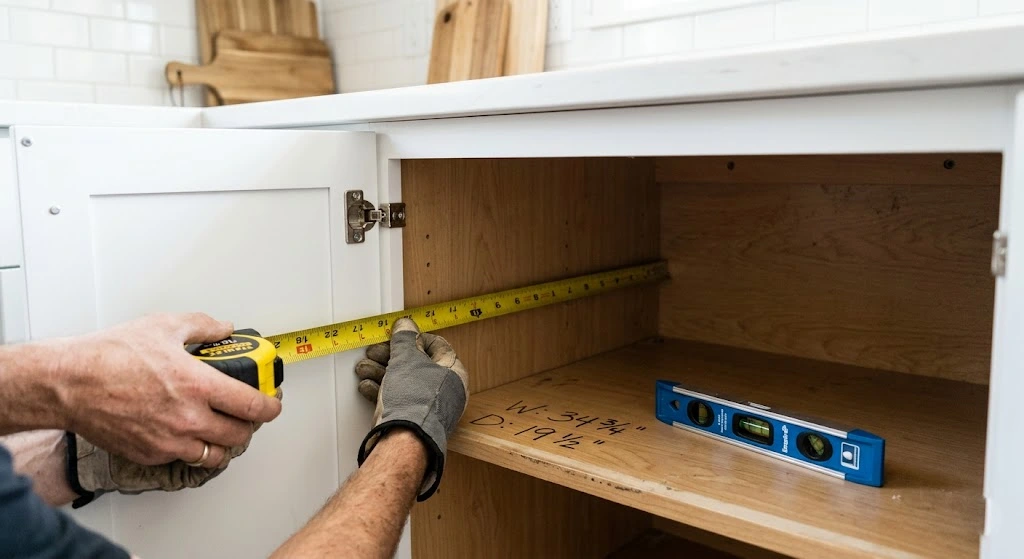
Open the cabinet door and measure the interior width of the opening — this is the clear space between the inner walls or face frame edges. Subtract exactly 1 inch from that number. That gives you the finished width of your shelf box, because each drawer slide takes up 1/2 inch on either side.
Next, measure the depth from the back wall to the front inside edge of the cabinet. Subtract 1 inch from that number too, so the shelf doesn’t hit the back when it’s fully closed. For most standard base cabinets, this puts you around a 22-inch depth, which is why 22-inch slides are a common choice.
Also check whether you have a face frame cabinet or a frameless one. Face frame cabinets have a wooden border around the front of the opening. Frameless cabinets — common in newer homes — have the cabinet wall flush with the door. This matters because face frame cabinets need spacers or standoff cleats to push the slides past the hinges and door frame. Frameless cabinets allow you to mount the slides directly to the side walls.
How to Build the Shelf Box
If you’re buying a pre-made shelf kit, skip this section and jump to installation. If you’re building your own, here’s how to put the box together.
Cut the shelf bottom from 3/4-inch plywood to your measured dimensions. Then cut the four frame sides from pine 1×3 boards — two pieces matching the shelf depth for the sides, and two matching the shelf width for the front and back. The frame gives the shelf structure and gives you something solid to screw the drawer rail sections into.
Assemble the frame with wood glue and 1 5/8-inch drywall screws, using simple butt joints at each corner. Attach the plywood bottom to the frame the same way. Once the glue dries, a light coat of spray lacquer seals the wood and makes it easy to wipe clean. Let it dry fully before moving to installation.
How to Install the Drawer Slides Inside the Cabinet
This is the step where precision really pays off. If the slides aren’t level and parallel to each other, the shelf will bind or pull to one side when you open it.
First, remove the cabinet door if possible — it makes working inside much easier. If you have a face frame cabinet, you’ll need to install standoff cleats first. These are strips of plywood ripped to the same thickness as your door hinge, which you screw to the inner cabinet wall. They bring the drawer slides forward and flush so the shelf clears the hinges without catching.
Place one drawer slide on the cabinet wall at your desired shelf height. Use a level to confirm it’s perfectly horizontal, then mark the screw holes with a pencil. Drive the screws in firmly but don’t overtighten — you may need to adjust slightly. Repeat the same process on the opposite side. The two slides must be at the exact same height, or the shelf will sit crooked.
A useful trick here is to use a scrap piece of wood as a shim under each slide while you position it. Hold the shim against the cabinet floor, set the slide on top, check level, and mark. This keeps both sides consistent without a lot of measuring back and forth.
For rear socket mounting — which some kits use — you’ll attach the back of the slide to the cabinet’s rear wall and the front to the face frame. Check your specific drawer slide instructions, as mounting points vary between manufacturers.
How to Attach the Rail Sections to the Shelf
Most drawer slides separate into two parts: the outer track that stays in the cabinet and the inner rail that rides on the shelf. Before you install the shelf, you need to attach those inner rail sections to the outside of the shelf box.
Take one rail section and hold it flush against the outer side of the shelf. Align the front of the rail with the front edge of the shelf, and position it slightly up from the bottom — your slide’s instructions will tell you the exact spacing. Mark the screw holes and attach the rail with the provided screws. Repeat on the other side, making sure both rails sit at the same height relative to the shelf bottom.
How to Slide the Shelf In and Test It
With the cabinet tracks mounted and the shelf rails attached, it’s time to put everything together. Close both drawer slides completely inside the cabinet. Hold the shelf just outside the opening, keeping it level with the mounted tracks. Align the shelf’s inner rails with the cabinet’s outer tracks, then push the shelf straight back until it locks into place.
Pull the shelf out slowly. It should glide without catching or tilting. Push it all the way back in — it should close flat and straight. If it binds on one side, the slides aren’t perfectly parallel. Loosen the screws on one side, adjust the position slightly, retighten, and test again.
Once the motion feels smooth, remove any shims you used during installation and sweep out the cabinet interior. Reinstall the cabinet door and you’re done.
Tips for Keeping Your Pull-Out Shelf Working Smoothly
Pull-out shelves need very little maintenance, but a few habits keep them sliding well for years. Every few months, wipe the tracks clean with a dry cloth to remove dust and grease buildup. A light application of paste wax or silicone spray on the slides keeps the motion feeling effortless.
Distribute weight evenly across the shelf rather than piling heavy items on one side. Ball-bearing slides handle a lot — typically 44 to 66 pounds — but uneven loads put stress on one rail and can cause binding over time. If you’re storing heavy cast iron or large canned goods, confirm your slide’s weight rating before loading it up.
If you notice the shelf sitting slightly crooked after a few months of use, check whether any screws have worked loose. A quick retighten usually fixes it completely.
Should You Buy a Kit or Build From Scratch?
Both approaches work well, and the right choice depends on your time and budget. Pre-made pull-out shelf kits cost between $30 and $80 per shelf and cut your installation time to about 30 minutes per cabinet. They’re a smart choice if you’re doing multiple cabinets or don’t want to deal with cutting wood.
Building from scratch costs less per shelf — roughly $15 to $25 in materials — and gives you exact control over dimensions. It’s the better path if your cabinets are an unusual size or you want a thicker, more durable shelf bottom than most kits provide.
Either way, the process is the same once you have a shelf box in hand. Measure carefully, mount the slides level, and take your time on the first one. After that, each shelf goes faster than the last.