
")
To replace a tile backsplash, remove old tiles with a chisel and hammer, patch and clean the wall, plan your new tile layout, apply thinset or mastic adhesive, set the tiles with spacers, let them cure, then grout, seal, and caulk the edges for a clean, finished look.
Why Replacing Your Tile Backsplash Is Worth the Effort
A kitchen backsplash takes a beating every day — grease, steam, food splatter. Over time, even the most stylish tile starts to look dated, dingy, or just plain tired. The good news? Knowing how to replace a tile backsplash is one of the most satisfying weekend projects a homeowner can tackle.
You don’t need to be a professional tiler. With the right tools, a little patience, and this guide, you can completely transform your kitchen without blowing your budget. A DIY backsplash replacement typically costs around $900 in materials, compared to $2,500–$3,000 when you hire a contractor.
Let’s walk through the whole process, from tearing out the old tile to the moment you step back and admire the finished wall.
What You’ll Need Before You Start
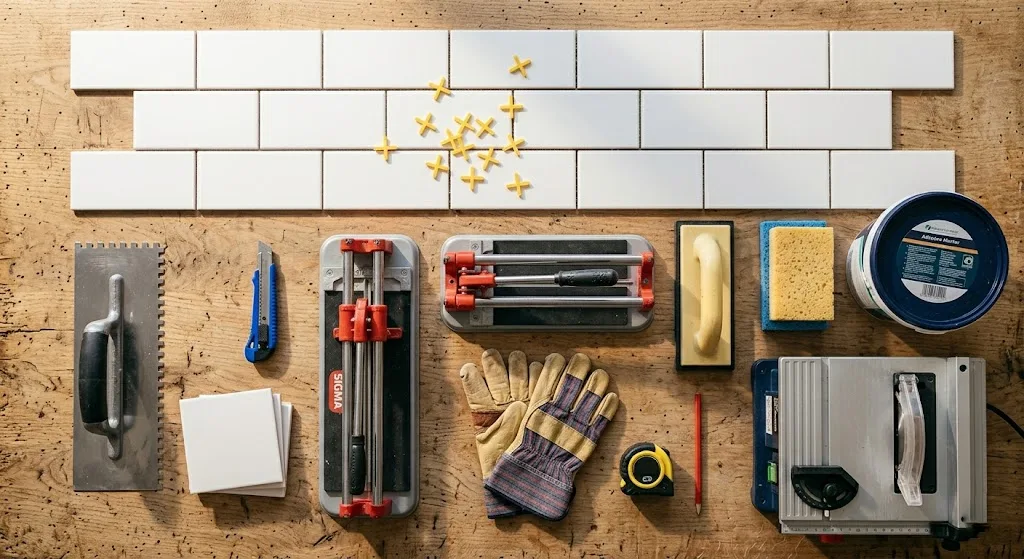
Getting your tools and materials together before you begin saves you from mid-project store runs. Here’s what to have on hand.
For the removal, you’ll need a utility knife, a chisel, a hammer (or rubber mallet), a 6-in-1 painter’s tool or putty knife, safety glasses, gloves, and a dust mask. For the installation side, pick up a notched trowel, tile spacers, thinset mortar or mastic adhesive, a rubber grout float, grout, grout sealer, caulk, a wet saw or manual snap cutter, and a level.
One important note on tile quantity: always buy about 10% more tile than your measurements say you need. Cuts, breakage, and future repairs will eat into your supply faster than you’d expect.
Step 1: Protect the Work Area
Before you swing a single hammer, take a few minutes to protect the surfaces around your work zone. Lay cardboard or drop cloths over your countertops to catch debris. Pull your stove, microwave, or refrigerator away from the wall if they sit in front of the backsplash area.
Remove all outlet covers and switch plates from the wall. These small covers will almost certainly crack if you leave them in place during tile removal.
One tip that professionals consistently emphasize: locate your electrical shutoff and your water main before you begin demo work. Tile removal can uncover hidden pipes and wiring, and you want to be able to react fast if something goes wrong.
Step 2: Remove the Old Tile
This step requires patience more than muscle. Rushing the demo is the number one reason people end up with a damaged wall underneath.
Start at an accessible edge — the side of the backsplash, or behind an appliance where you can get your tool underneath the tile. Use the sharp edge of your painter’s tool or chisel, hold it at an angle (not straight into the wall), and tap it gently with a hammer to break up the grout lines. Working at a diagonal angle helps you avoid driving the chisel directly into the drywall behind the tile.
Once the grout loosens, carefully pry tiles off one at a time. Go slowly and keep the angle shallow. If the drywall tears significantly in a few spots, don’t panic — you can patch it. But if entire sections are crumbling, you may need to replace that portion of drywall before installing new tile.
After all the tiles are off, scrape away old adhesive residue from the wall as thoroughly as you can.
Step 3: Prep the Wall Surface
A smooth, clean wall is what makes a tile backsplash installation last for years. Don’t skip this step.
Fill any holes, gouges, or torn drywall paper with premixed drywall compound. Let it dry fully, then sand the patched areas smooth. For larger dips or uneven spots, apply joint compound and feather the edges so the surface is as flat as possible.
Once the wall is smooth, clean it thoroughly. If the area above your stove has grease buildup, use a degreaser before anything else. Thinset and mastic adhesives won’t bond properly to a greasy or dusty surface, and tiles will eventually pop off if the wall wasn’t cleaned first.
If your new backsplash area gets heavy moisture exposure, consider installing cement backerboard over the drywall before tiling. It’s an extra step, but it adds long-term durability and protects against water damage.
Step 4: Plan Your Layout
Taking 30 minutes to plan your tile layout before you touch any adhesive can save hours of frustration later.
Measure the height and width of your backsplash area and subtract any space taken up by cabinets, windows, or outlets. Use those measurements to lay your tiles out on a flat surface — the floor works great — and visualize exactly how the finished wall will look.
Find the center point of each wall section and work outward from there. This approach creates a balanced, symmetrical appearance. If tiles on one side of the layout would need to be cut down to a very thin sliver, shift the whole layout slightly so that cut pieces on both sides end up roughly the same size.
Mark reference lines on the wall with a pencil and a level. These guide lines keep your rows straight and even as you install.
Step 5: Apply the Adhesive
Spread your adhesive — thinset mortar or mastic — over a small section of the wall at a time. Work in sections of about two square feet so the adhesive doesn’t dry before you set the tiles.
Hold your notched trowel at a 45-degree angle to the wall and drag it through the adhesive to create ridges. These ridges give the tiles something to grab onto and ensure a stronger bond. Press firmly so the trowel makes full contact with the wall.
A quick tip on adhesive choice: mastic works well for ceramic and porcelain tile in dry-to-moderate moisture areas. If you’re installing natural stone tile, use thinset instead — mastic can discolor lighter stone over time. For thinset, mix it according to package directions, then let it rest for about 10 minutes before use. This “slaking” period activates the chemistry in the mix and makes it easier to work with.
How to Set and Space Your New Tiles
Press each tile firmly into the adhesive with a slight twisting motion to ensure good contact. Don’t slide tiles into position — press straight in.
Place plastic tile spacers in the corners between each tile as you go. These little pieces of plastic do a lot of work: they keep your grout lines consistent and prevent tiles from shifting while the adhesive cures. Most backsplash installations use 1/16″ or 1/8″ spacers, but check what the manufacturer recommends for your specific tile.
Work your way across the wall in rows, checking your reference lines regularly. Use a level every few tiles to make sure nothing is drifting. Once all the full tiles are set, measure and cut the border tiles to fit snugly against cabinets, outlets, and edges. For ceramic or porcelain, a manual snap cutter handles straight cuts well. For glass tile or trickier shapes, use a wet saw.
Let the adhesive cure for the time specified on the packaging — typically 24 hours — before moving on to grout.
Step 6: Grout the Tiles
Remove all the plastic spacers before you start grouting. Mix your grout with water according to the package directions until it reaches a smooth, consistent texture.
Load your rubber grout float and spread grout diagonally across the tile surface, working it firmly into the joints between tiles. Holding the float at about 45 degrees and moving diagonally across the tiles — rather than parallel to the joints — helps pack the grout in more effectively.
After working grout into a section, pull the float diagonally across the tiles again to remove the excess from the face of the tile. Let the grout sit for about 10 minutes, then wipe the tile surface with a clean, damp sponge. Wring the sponge out well before each pass, and rinse it often. Wipe diagonally to avoid pulling grout back out of the joints.
A grout haze will form on the tiles as everything dries. After a couple of hours, buff it away with a dry microfiber cloth.
Step 7: Seal and Caulk
Once the grout has cured — usually 24–72 hours — apply a grout sealer using a brush or small roller. Sealer protects the grout from staining and moisture, and it makes day-to-day cleaning much easier. Apply it evenly, let it soak in for a few minutes, then wipe off the excess.
One step that gets skipped surprisingly often: caulking the transitions. Anywhere your backsplash meets a different surface — the countertop, the underside of upper cabinets, or inside corners — needs caulk, not grout. These joints experience slight movement as the house settles and temperatures change. Grout is rigid and will crack at these spots over time. Use a color-matched silicone caulk, apply a thin, even bead, and smooth it with a damp fingertip for a clean professional finish.
Reinstall your outlet covers and switch plates, and you’re done.
Common Mistakes to Avoid
Rushing the demo almost always means extra wall repair. Swinging hard at tile with a hammer might feel satisfying, but it’s a good way to punch holes in the drywall underneath.
Skipping the wall prep step is another big one. A wall that isn’t clean and smooth leads to tiles that don’t bond properly — and eventually, tiles that start falling off.
Don’t try to eyeball straight lines. Use a level and mark your reference lines on the wall. Tiles that look level to the naked eye often aren’t, and a slightly crooked row compounds quickly across the whole backsplash.
Finally, don’t confuse grout and caulk. The joints where different surfaces meet need flexible caulk, not rigid grout. It’s a small detail that makes a real difference in how long your backsplash holds up.
Wrapping Up
Replacing a tile backsplash is a genuinely satisfying home improvement project. Yes, the demo can be messy, and the installation takes patience — but the result is a kitchen that looks completely refreshed and entirely yours.
Take your time with each step, especially the prep work and the layout planning. Those two phases set up everything that follows. Once you’ve got new tiles on the wall, grouted and sealed and caulked along the edges, you’ll have a backsplash that not only looks great but will hold up for years to come.
Ready to get started? Grab your tools, protect the countertops, and go from that old, dated tile to a fresh kitchen you’ll actually love looking at.