

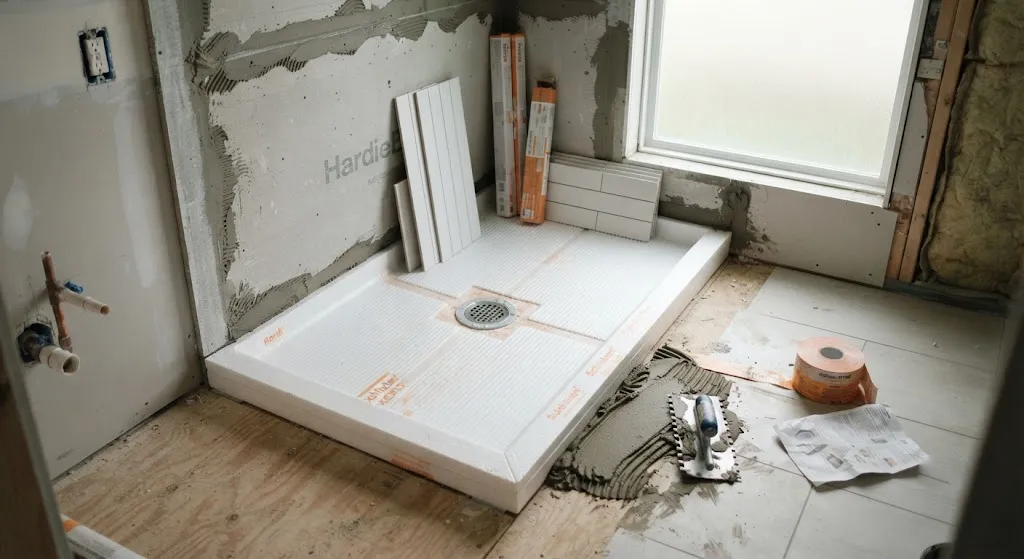
If you’re planning a shower remodel, you’ve probably run into the term “pre-sloped foam shower pan.” It sounds technical, but the idea is simple: it’s a factory-made base that already has the correct tilt built in, so water flows straight to the drain instead of pooling on your bathroom floor.
Prices for these pans run from about $70 for a basic DIY kit to $900 or more for a name-brand system with a linear drain. Once you add labor, waterproofing, and tile, most homeowners end up spending $1,500 to $3,000 for the whole project.
That’s a wide range, and there’s a good reason for it. You’re not really shopping for one product — you’re choosing between three very different options: a budget foam kit, a branded prefabricated pan, or a custom-built pan made for your exact shower shape. Let’s break down what each one costs, how they compare, and how to avoid the mistakes that cause leaks down the road.
Foam Pan vs. Mortar Bed: What’s the Real Difference?
The old-school way to build a shower floor is a mortar bed (also called a mud bed). A tile setter mixes sand and cement on-site, packs it by hand, and shapes the slope using a screed guide. It works well, but it’s slow — it can take a full day or two just to build and cure before anyone can even think about tiling.
A pre-sloped foam shower pan skips all of that. Manufacturers mold the correct pitch into a rigid foam base — usually expanded polystyrene (EPS) or extruded polystyrene (XPS) — before it ever reaches your bathroom. You simply set the pan down, bond it to the subfloor, seal the seams, and in many cases you’re ready to tile the same day.
Most building codes require a shower floor to slope about 1/4 inch per foot, roughly a 2% pitch, so water reaches the drain instead of sitting on the tile. A pre-sloped pan already meets that standard, which removes one of the trickiest parts of a DIY shower build.
How Much Does a Pre-Sloped Foam Shower Pan Cost?
Pricing depends heavily on which type of pan you buy. Here’s a full cost breakdown for 2026:
| Item or Service | Typical Cost Range | What Affects the Price |
|---|---|---|
| Budget DIY foam pan kit | $70 – $200 | Pan size, center vs. offset drain, whether a curb is included |
| Branded pan (Schluter Kerdi-Shower, Wedi Fundo) | $200 – $900+ | Brand, footprint size, linear vs. center drain |
| Custom-cut foam pan | From ~$25.50 per sq. ft. | Custom slope, curb options, minimum order size, shipping |
| Full professional installation | $1,500 – $3,000 | Local labor rates, tile choice, drain upgrades, old shower removal |
| Traditional mortar bed floor | $600 – $1,500 | Tile setter’s rate, curing time, liner material |
As of mid-2026, national data puts the average cost of a fully installed shower pan at roughly $1,536 to $2,967 — which matches what most homeowners report paying a licensed contractor. That figure covers the pan, waterproofing, labor, and standard tile, but it doesn’t include upgrades like natural stone or a built-in shower bench.
A quick note on these numbers: They’re based on manufacturer pricing pages, published labor averages, and current retail listings — not a single quoted job. Your actual bill will depend on your region, whether your contractor charges by the hour or by the job, and how much demolition your bathroom needs. Use these figures as a starting point for a conversation with a contractor, not a locked-in quote.
Schluter vs. Wedi vs. Budget Kits: Which One Should You Buy?
Schluter’s Kerdi-Shower line combines a pre-sloped tray with the brand’s own waterproofing membrane already bonded to the surface. Smaller center-drain trays start around $212, while larger linear-drain configurations can climb toward $900.
Wedi’s Fundo Riolito Neo system follows a similar pattern. Entry-level pricing starts near $360, with bigger linear-drain bases pushing close to $900 as well.
Budget foam kits — sold under brand names like VEVOR — use a similar EPS foam base wrapped in a waterproof membrane. They typically cost $70 to $200 for common sizes like 36×36 or 48×48 inches. Plenty of DIYers use these successfully, but they don’t come with the same documented testing history or dedicated support line that Schluter and Wedi provide.
Custom shops like RodKat and Built With Foam build a pan to your shower’s exact dimensions instead of a fixed size. This matters if your shower isn’t a standard rectangle. You’ll pay more per square foot, but you skip the risk of trimming down a stock pan and accidentally ruining the slope.
How to Install a Pre-Sloped Foam Shower Pan
- Check the subfloor. Make sure it’s flat, clean, and structurally sound. Plywood or cement backer board both work.
- Dry-fit the pan over the drain location before bonding anything. Confirm the drain hole lines up with your existing plumbing.
- Set the pan in a bed of thin-set mortar and press it firmly into place.
- Connect the drain following the manufacturer’s instructions — drain compatibility varies between brands.
- Waterproof every seam, corner, and curb using tape or a liquid membrane.
- Let the thin-set cure fully, then tile directly onto the pan with more thin-set.
Most pans arrive tile-ready, meaning you usually don’t need a separate waterproofing layer over the main surface — just careful seam sealing. Always read the specific product manual before starting, since drain heights and flange types can differ enough between brands that a Schluter drain won’t fit a Wedi pan.
Mistakes That Cause Leaks (Avoid These)
- Cutting into the sloped field. Trimming the outer edges of a foam pan is usually fine, but cutting through the sloped surface itself can flatten the pitch and leave standing water.
- Skipping the seam tape. A foam pan is only watertight if every joint — between the pan, curb, and wall — is properly taped and sealed. Water will find its way through an unsealed seam within a year or two.
- Mixing brands. A generic drain dropped into a Schluter or Wedi pan often won’t seal correctly, since each brand engineers its flange height and gasket to match its own drain. Stick with the drain the manufacturer specifies.
When You Need a Licensed Plumber or Tile Pro
If your project involves moving or adding a drain line, that’s plumbing work — it usually requires a permit and a licensed plumber, not just a tile installer.
Curbless or barrier-free showers raise the difficulty level too, since the subfloor often needs to be recessed to keep the finished floor level with the rest of the bathroom. A contractor experienced with linear drains and curbless designs will avoid the framing errors that cause leaks years later. Always check your local building codes before demolition — many areas require an inspection at the waterproofing stage, before tile goes down.
Foam Pan or Mortar Bed: Which One Fits Your Project?
A foam pan is the better choice for a standard rectangular or square shower where a stock size fits without much trimming. It saves one to two days of labor compared to a mortar bed, and the factory-built slope removes the biggest source of error in a DIY shower.
A mortar bed still wins for oddly shaped showers, curbless designs with tight height limits, or when a tile setter wants full control over the shape and pitch. It costs more in skilled labor, but it adapts to any layout without the size restrictions of a manufactured pan.
The Bottom Line: What Will You Actually Pay in 2026?
A pre-sloped foam shower pan on its own costs $70 to $900, depending on the brand and size you choose. A fully installed shower — pan, labor, and tile — typically lands between $1,500 and $3,000.
Size, drain type, brand, and whether you tile it yourself will affect that final number more than anything else. For a standard shower with a stock-size layout, a foam pan remains one of the fastest and most forgiving ways to get a waterproof, tile-ready base — without building a mortar bed from scratch.
Frequently Asked Questions
Is a foam shower pan as durable as a mortar bed?
Yes, when installed correctly. High-density EPS or XPS foam pans hold up to daily use for decades, and several manufacturers rate their pans for residential and even light commercial use. Durability depends more on proper bonding and seam sealing than on the base material itself.
Can I cut a pre-sloped foam shower pan to fit my shower?
You can trim the outer edges of most pans to adjust the footprint, and some brands even sell cut-to-fit versions. Just avoid cutting into the sloped field, since that can flatten the pitch and cause standing water.
Do I still need a waterproofing membrane over a foam shower pan?
Most pre-sloped pans come pre-waterproofed on the surface, so a separate membrane usually isn’t needed. You still need to waterproof the seams, corners, and curb, since those joints are the most common failure points.
What stock sizes are available?
Common sizes include 32×32, 36×36, 48×48, 60×32, 60×38, and 72×72 inches, along with several neo-angle and offset-drain options. Custom shops can build outside these dimensions for an added cost.
Is a linear drain or center drain better?
Neither is objectively better — it comes down to your layout. A linear drain lets the pan slope in one direction, which pairs well with large-format tile, while a center drain requires a four-way slope that suits smaller or square showers.
For more home renovation cost breakdowns and expert installation tips, stay with zillohome.
