

If you’re building or renovating a tile shower, waterproofing the pan is the one step you can’t afford to rush. Get it right, and your shower will last decades. Get it wrong, and you could be looking at a repair bill of $5,000 to $15,000 or more once water finds its way into your subfloor, wall framing, and floor joists.
This guide breaks down exactly how shower pan waterproofing works, compares the three main systems homeowners and pros use in 2026, walks through the full installation process step by step, and gives you real cost numbers so you can budget with confidence.
What Does Shower Pan Waterproofing Actually Do?
Here’s something a lot of homeowners don’t realize: tile and grout are not waterproof. Grout is essentially fine sand held together with Portland cement, and it’s porous by nature. Every time you shower, water seeps through the grout lines. That’s normal — it’s expected to happen every single time.
The job of a waterproofing system is to catch that water before it reaches anything it can damage, and route it safely down to the drain.
A properly built shower pan does this in two stages:
- A sloped mortar base guides water toward the drain.
- A waterproof membrane sits either under that mortar base (the traditional method) or directly beneath the tile (the bonded membrane method).
Both approaches work well when installed correctly. Which one is right for you depends on your budget, your comfort level with hands-on construction, and the shape of your shower.
No matter which system you choose, four spots demand extra attention: seams, corners, the area around the drain, and the junction where the curb meets the door jamb. These are the weak points where nearly every shower leak starts. Miss one of them, and water will eventually find it.
The Three Main Shower Pan Waterproofing Systems
1. Traditional PVC or CPE Pan Liner
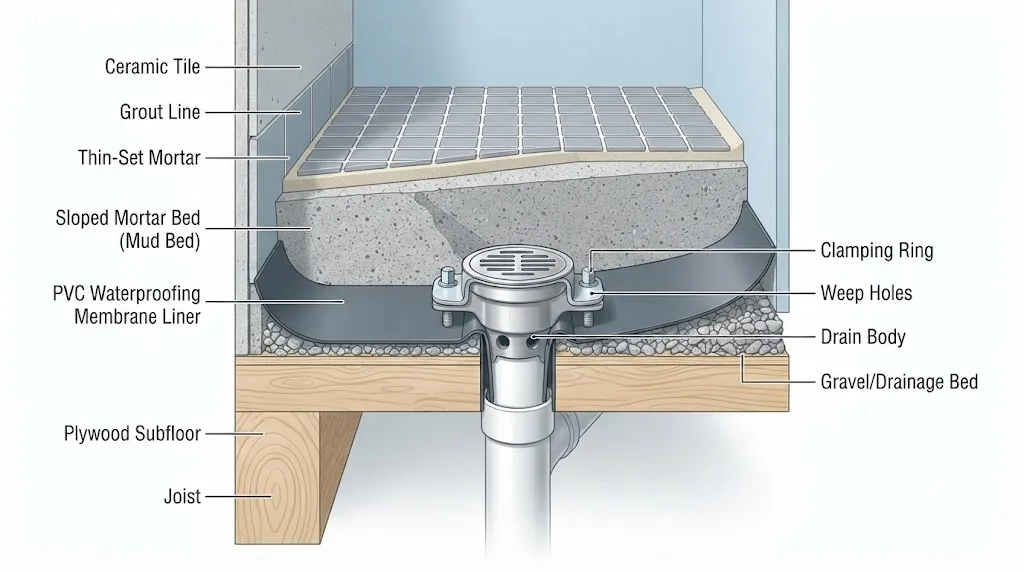
This is the old-school method, and it’s still one of the most widely used approaches today. A flexible sheet of PVC or CPE (chlorinated polyethylene) plastic gets sandwiched between two layers of mortar. The bottom mortar bed is pre-sloped at 1/4 inch per foot toward the drain, the liner rests on top of that slope, and a second mortar bed goes over the liner to give the tile something solid to bond to.
Oatey is the best-known brand in this space. Its PVC shower pan liners come in 30 mil and 40 mil thicknesses. For most residential showers, the 40 mil version is worth the small price bump — it resists punctures far better during mortar packing and tile setting. Oatey’s liner kits also include pre-formed corner dams, which seal the curb-to-jamb junction, one of the most leak-prone spots in the entire shower.
One important detail people often miss: tile is never installed directly on the liner. The second (top) mortar bed is what the tile actually bonds to. Thin-set mortar should never touch the liner surface directly.
Drain connection matters just as much. A traditional liner drain uses a clamping ring that sandwiches the liner between the drain body and the ring itself. The weep holes on the drain sit above the liner, so any water that makes it through the top mortar bed still has an exit path. If those weep holes get clogged with thin-set during installation — which happens more often than you’d think — water pools inside the mortar bed, and the system fails slowly, often without any visible warning until real damage has occurred.
2. Sheet Membrane Systems (Schluter Kerdi)
Schluter’s Kerdi system flips the traditional approach. Instead of burying the waterproof barrier under the mortar, Kerdi places it right on top of the substrate, directly beneath the tile. The membrane bonds to the substrate with unmodified thin-set, and tile bonds to the membrane’s fleece surface using that same thin-set.
There’s no second mortar bed and no manual pre-slope required, because Schluter sells a pre-formed foam shower pan (the KERDI-SHOWER-T) with the slope already built in.
The Kerdi drain connects directly into the membrane, creating one continuous waterproof layer from the drain to the walls to the curb. Water never touches the substrate or any wood framing. Because there’s no saturated mortar bed sitting between showers, you avoid the grout discoloration and hidden mold growth that can plague traditional systems over time.
Kerdi does cost more upfront. Based on pricing discussions across professional tile-setting communities like the John Bridge tile forums, a complete Kerdi shower typically runs about $250 to $300 more in materials than a traditional cement board and PVC liner build for a standard 3×5 shower. That said, labor time is often shorter, since you skip the pre-slope pour and the second mortar bed entirely.
3. Liquid-Applied Waterproof Membranes
Products like Laticrete Hydro Ban and RedGard are rolled or brushed directly onto cement board or an existing substrate. They cure into a flexible, bonded waterproof coating, and tile goes straight on top once the product dries — usually after two coats.
Liquid membranes are popular on shower walls and for simpler floor layouts because application is fast. The catch is thickness control. It’s easy to leave thin spots, especially in corners and around the drain, and those thin spots become weak points. Tile setters who work primarily with Kerdi or PVC liner systems often point out that liquid membranes require precise, consistent application to perform reliably — which makes them a slightly riskier DIY choice specifically for shower floors (they’re much more forgiving on vertical wall surfaces).
Shower Pan Waterproofing: Step-by-Step Guide (PVC Liner Method)
This is the most common DIY route, and it’s the method most plumbing supply stores are set up to support. Here’s the process from bare subfloor to tile-ready.
1. Prepare the subfloor. It needs to be clean, dry, and structurally solid. Any soft spots or flex in the floor will crack the mortar bed — and eventually the liner — over time. Fix squeaks or deflection before you do anything else.
2. Install the drain base. Set the bottom drain body at the correct height so your finished shower floor sits flush with the surrounding area, and so the mortar layers above it come out at the right thickness.
3. Pour the pre-slope mortar bed. Mix deck mud (a dry-pack mortar of Portland cement and sand) and pack it at 1/4 inch per foot, sloping down from the walls toward the drain. This bed typically runs 2 to 3 inches thick at the drain and gets thicker toward the walls. Let it cure fully per the mortar manufacturer’s instructions before moving on.
4. Cut and lay the PVC liner. Measure carefully — the liner needs to extend at least 3 inches above the finished curb height on every side. Fold the corners and bond them with Oatey X-15 adhesive (or Oateyweld for CPE liners). Staple the liner only to wall framing above curb height. Never staple below the curb line; any penetration there breaks the waterproof seal.
5. Install the curb liner pieces. Cut separate liner sections to wrap the curb. Total width should equal the inside curb height, plus the outside curb height, plus the top curb width. Bond these with adhesive and staple only to the outside face of the curb.
6. Clamp the liner to the drain. Remove the clamping ring, position the liner over the drain, and cut a hole slightly smaller than the drain opening. Bolt the ring down evenly to compress the liner against the drain body for a watertight seal — and keep the weep holes clear.
7. Flood test the liner. Plug the drain and fill the pan with about 2 inches of water. Leave it for 24 hours. Any drop in water level signals a leak. Track it down and fix it now, before you bury the liner under mortar.
8. Pour the top mortar bed. This layer sits over the liner and gives tile a surface to bond to. It needs to match the same slope as the layer below. Pack carefully around the drain clamping ring so the weep holes stay open.
9. Install cement board on the walls. Attach cement board (like HardieBacker) to wall studs with screws, keeping the bottom edge 1/8 to 1/4 inch above the liner so it can’t wick moisture upward. Tape seams with fiberglass mesh, then apply a waterproof membrane or liquid coating over the board in all wet areas.
10. Set tile with wet-area thin-set. Use thin-set rated for wet environments, and press tile firmly for full back coverage. Once tile has cured, grout it — then seal the grout-to-wall and floor-to-wall transitions with 100% silicone caulk, never grout. Caulk flexes with normal house movement; grout cracks.
Shower Waterproofing Cost Breakdown for 2026
| Item / Service | Typical Cost Range | What Affects the Price |
|---|---|---|
| PVC or CPE pan liner (materials only) | $40–$120 | Thickness (30 vs. 40 mil), size, kit vs. roll |
| Pre-slope and top mortar bed (materials) | $30–$80 | Shower size, number of bags needed |
| Schluter Kerdi sheet membrane (materials) | $150–$350 | Roll size, full kit vs. individual pieces |
| Liquid membrane (RedGard, Hydro Ban) | $40–$100 per gallon | Coverage area, number of coats |
| Cement board (walls and floor) | $1.50–$3.50 per sq ft | Brand, thickness, sheet size |
| Drain (traditional clamp or Kerdi drain) | $30–$180 | Material (ABS vs. stainless), type |
| Labor for waterproofing only | $350–$700 | Method, market, complexity, size |
| Full tile shower pan installed (materials + labor) | $900–$2,300 | Size, method, local rates, permits |
| Water damage repair if liner fails | $5,000–$15,000+ | Extent of damage, mold remediation, structural repair |
Waterproofing materials are usually a small slice of a full shower budget — often under 10% of total renovation cost. The financial risk of skipping steps here is dramatically out of proportion to the savings. According to Angi’s 2026 pricing data, average shower pan replacement runs $900 to $2,300, with the low end covering a simple prefab pan swap and the high end covering a fully custom tile pan with labor.
A quick note on these numbers: the ranges above come from a review of publicly available pricing from Angi, manufacturer product pages (Oatey, Schluter), and general contractor data current as of mid-2026. They’re editorial estimates, not guaranteed quotes — regional labor rates and material costs vary. For the waterproofing-only portion of a job (materials plus labor for the liner or membrane), current estimates put typical pricing at $350 to $1,000 for a standard 3×5 shower, depending on system choice. Always get at least two local quotes before finalizing your budget, since permit requirements, subfloor condition, and drain relocation needs all move the final number.
PVC Liner vs. Schluter Kerdi: Which One Should You Choose?
Both systems work well when installed correctly. The real decision comes down to your skill level, timeline, and how much you value simplicity over upfront cost.
Traditional PVC liner has been the industry standard for decades. It’s cheaper in materials, well understood by nearly every tile setter, and the parts are stocked at any plumbing supply store. The trade-off is complexity: pouring two mortar beds with a consistent slope takes real skill, folding liner corners without creasing or puncturing the material is trickier than tutorials make it look, and clogged weep holes can leave the mortar bed permanently wet without you knowing.
Schluter Kerdi costs more in materials but simplifies the build significantly. The pre-formed foam pan handles the slope for you, the membrane goes on in a single bonded layer, and there’s no wet mortar bed sitting between the tile and the substrate. Because the drain, membrane, corners, and curb pieces are all engineered to work together, there’s less guesswork — and Schluter’s technical support line is genuinely helpful if you get stuck mid-project. For someone tackling their first tile shower, Kerdi is generally the more forgiving system to get right on the first try.
Liquid membranes land below both in material cost and shine on walls. On floors, they’re better suited to installers with some experience, since consistent thickness control matters more than it seems. They’re a reasonable budget-friendly option for simple shower layouts without multiple curbs or complicated corners.
Common Shower Pan Waterproofing Mistakes to Avoid
- Skipping the pre-slope. If the liner sits flat instead of on a sloped mortar bed, water collects above it instead of draining through the weep holes. The mortar stays wet, grout discolors, and mold can develop inside the wall where you’ll never see it until it’s a serious problem.
- Penetrating the liner below curb height. Staples belong only on wall framing above the finished curb line. Any fastener below that line creates a leak point.
- Blocking the drain weep holes with thin-set. It’s easy to accidentally press mortar into the weep holes while packing the top bed. Cover them with foam or tape during the pour, then remove it before flood testing.
- Using grout instead of silicone caulk at floor-to-wall transitions. Floors and walls shift slightly as a house settles. Grout cracks under that movement; silicone caulk flexes and stays sealed. Match the caulk color to your grout for a seamless look.
- Mixing membrane systems from different manufacturers. Schluter’s Kerdi membrane is engineered to bond with unmodified thin-set on its fleece surface. Combining it with a different brand’s liquid membrane at a transition point can leave a gap that neither system was designed to seal. Stick to one system per shower.
When to Call a Professional
DIY shower pan waterproofing is realistic if you’re comfortable with basic mortar work, plumbing connections, and tile setting. But if you’ve never worked with deck mud before, achieving a consistent 1/4-inch-per-foot slope is harder than most tutorials suggest — and a bad slope means standing water and eventual failure.
Bring in a licensed tile setter or plumber if:
- The subfloor already has soft spots or rot from a previous leak
- Your design includes multiple curbs, a curbless entry, or a linear drain
- You’re building a steam shower (which requires full floor-to-ceiling waterproofing, not just a pan)
- You’re working over a concrete slab that may need to be cut for drain relocation
Professional installation also matters for warranty coverage. Some manufacturers, including Schluter, offer material warranties that can be conditioned on correct installation. If a liner fails and causes subfloor damage, being able to prove the original install was done correctly makes a real difference. Whether you DIY or hire out, document the flood test with photos — it’s cheap insurance against a dispute down the road.
Getting It Right the First Time
The material cost gap between doing shower pan waterproofing correctly and cutting corners is often less than $100. Tearing out a failed shower, replacing rotted subfloor and framing, and remediating mold typically starts at $5,000 and climbs fast if the damage has spread beyond the shower area.
For most first-time tile shower builders, the Schluter Kerdi system is the more forgiving option — it costs more in materials but eliminates the trickiest steps of the traditional method. If you’d rather go the traditional route, the Oatey PVC liner kit with pre-formed corner dams handles the highest-risk spots well. Whichever system you choose, flood test before you pour the top mortar bed. That 24-hour test has saved countless tile jobs from failing months — or years — down the line.
Frequently Asked Questions
Do I need to waterproof the walls as well as the floor?
Yes. Water from the showerhead hits the walls directly, and wall tile grout is just as porous as floor grout. At minimum, use a waterproof membrane or a waterproof substrate like cement board topped with a liquid membrane. Pay special attention to the top edge of the tile where it meets the dry drywall above — seal that transition carefully with silicone caulk or a compatible membrane overlap.
How thick should the mortar bed be under a shower pan liner?
The pre-slope bed should run 2 to 3 inches thick at the drain, sloping upward at 1/4 inch per foot toward the walls. The top bed follows the same slope. Thinner pours are possible with higher-strength cement mixes, but going below about 3/4 inch on the top bed risks cracking under foot traffic.
What’s the difference between a 30 mil and 40 mil PVC pan liner?
It’s thickness, measured in thousandths of an inch. A 40 mil liner (0.040 inches) resists punctures from staples, mortar aggregate, and dropped tools noticeably better than a 30 mil sheet. For residential tile showers, the 40 mil version is worth the small added cost; 30 mil is better suited to lighter-duty applications.
Can I install a Schluter Kerdi membrane myself?
Yes — many homeowners do. The system is designed with DIY installers in mind. The key requirements are using unmodified thin-set (never modified), keeping full coverage behind the membrane with no air pockets, and using compatible Kerdi accessories for corners and the drain. Schluter’s website and YouTube channel offer detailed installation videos, and their technical support line is available for installation questions.
How long does a shower pan liner last?
A correctly installed PVC or CPE liner should last 20 years or longer. Failures almost always trace back to installation errors, not material age — missed pre-slopes, penetrations below the curb line, or clogged weep holes are the usual culprits. Schluter Kerdi systems carry similar expectations, with many residential installations lasting 25 years or more.
Does shower pan waterproofing require a building permit?
It depends on your local jurisdiction and the scope of work. A full shower rebuild usually requires a permit, especially if plumbing is being moved. Waterproofing done as part of a straightforward tile replacement may or may not need one locally. Check with your building department before starting — unpermitted work can complicate a home sale or an insurance claim if water damage shows up later.
