

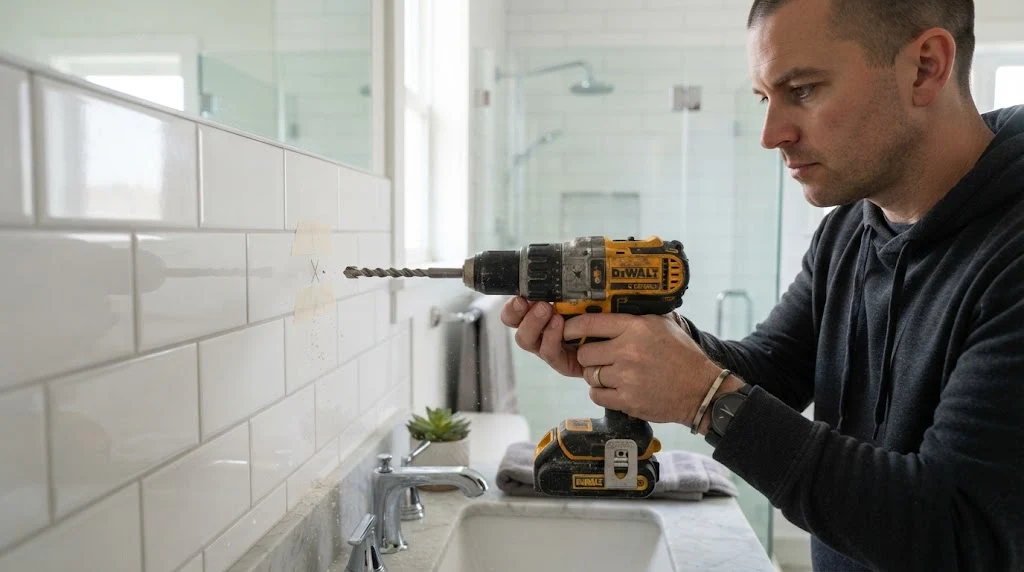
Drilling into tile sounds scary. One wrong move and you’ve got a spiderweb crack running across your brand-new bathroom wall. But here’s the good news: drilling through ceramic tile is actually a beginner-friendly job once you know a few key tricks. With the right drill bit, a steady hand, and a little patience, you can hang that towel bar, mount the toilet paper holder, or install a medicine cabinet without a single chip.
Whether you’re updating an old bathroom or finishing a brand-new tile job, most wall-mounted hardware needs a hole drilled straight through the tile. This guide walks you through exactly how to do it safely, step by step, plus how to handle bigger holes for plumbing fixtures and what to do if something goes wrong.
Know Your Tile Before You Drill
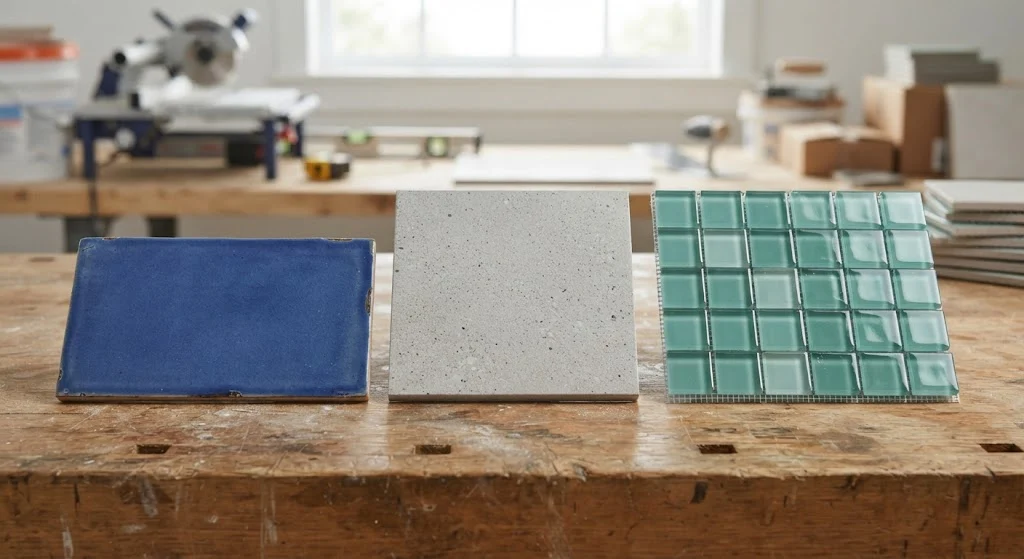
Not all tile is created equal, and the type you’re working with changes how you should approach the job. Take a minute to figure out what you’re dealing with before you pick up a drill.
- Ceramic tile is the most common choice in both older and newer homes. It has a softer composition than porcelain, which makes it easier to drill through — but it can still crack if you rush the job or use the wrong bit.
- Glass tile is the most fragile of the three. It’s prone to chipping and cracking, so it demands extra care, a slower drilling speed, and the right specialty bit.
- Porcelain tile is fired at higher temperatures and made from denser clay, which makes it tougher and less porous than ceramic. That durability is great for floors and walls, but it also means you’ll need a stronger bit to get through it cleanly.
If you’re not sure which type you have, treat it like porcelain and use a diamond-tipped bit. It’s better to be over-prepared than to crack a tile you can’t easily replace.
Tools You’ll Need to Drill Tile Successfully
Having the correct gear on hand before you start makes the entire process smoother and dramatically lowers your risk of a cracked tile.
The Right Drill Bit Matters Most
Your choice of drill bit is the single biggest factor in whether this job goes smoothly.
- Carbide-tipped masonry bits work well for standard ceramic tile. They’re affordable, durable enough to handle the tile’s hardness, and widely available at any hardware store.
- Diamond-tipped bits are the better choice for porcelain or glass tile, or any time you’re unsure what you’re working with. They cost more, but their cutting edge can slice through even the toughest tile without excessive heat or pressure.
Other Supplies to Gather
Beyond the bit itself, round up the following before you begin:
- Power drill (corded or cordless both work fine)
- Level, if you’re lining up multiple mounting points
- Masking tape
- Pencil or marker for marking your drill points
- Safety glasses and a dust mask
- Spray bottle filled with water, for cooling the bit when working with glass or porcelain
Safety Tips for Drilling Into Tile
Power tools and shattered ceramic don’t mix well without proper precautions. Take these steps seriously before you turn on the drill.
Wear Protective Gear
Safety glasses shield your eyes from flying tile chips, and work gloves protect your hands from sharp edges. Don’t skip the dust mask, either — drilling ceramic tile can release fine silica dust, and breathing it in repeatedly over time has been linked to serious respiratory issues.
Control the Dust as You Go
Tile drilling kicks up more dust than you might expect. Work in a well-ventilated space, keep a shop vacuum nearby to clean up debris right away, and consider spraying a light mist of water on the tile as you drill to keep dust down.
Pro tip: Before drilling near a tub or sink, line the surface with cardboard and a towel. This keeps tile fragments from scratching the tub or slipping down the drain while you work.
Step-by-Step: How to Drill a Standard Hole in Tile
Getting a clean, accurate hole comes down to careful prep work followed by a controlled, patient drilling technique.
Step 1: Measure and Mark Your Spot
Measure twice — actually, measure three times — before marking anything. If you’re installing a fixture with more than one mounting point, like a towel bar or grab bar, use a level to make sure your marks line up correctly. Whenever possible, aim for the center of a tile rather than near an edge or grout line, since edges are far more likely to crack under pressure.
Step 2: Add Masking Tape for Grip
Place a strip of masking tape directly over your marked spot. The tape gives the drill bit something to grip onto at the start, which helps stop it from skating across the glossy tile surface. Re-mark your drill point on top of the tape so you don’t lose your spot.
Pro tip: For even more control, hold the bit (not yet in the drill) against your mark and tap the back of it gently with a hammer to create a small starter divot in the tile. This tiny dent keeps the bit from wandering once you start spinning it — and it works even better than tape alone.
Step 3: Start Drilling Slowly
If you’re working with porcelain or glass, fill your spray bottle and mist the bit and tile as you drill. This keeps the bit cool, cuts down on dust, and lowers your risk of cracking the tile.
Line up your bit with the mark and start at a low speed with light, even pressure. Resist the urge to push hard or rush — going slow at the start is what prevents chips and cracks.
Step 4: Increase Speed Gradually
Once the bit has bitten into the tile and created a stable groove, you can pick up the pace slightly. Medium speed with consistent, gentle pressure is the sweet spot — full throttle generates too much heat and increases the odds of a crack. Keep misting water on porcelain or glass as you go.
Step 5: Ease Off as You Break Through
You’ll typically feel a slight change in resistance right before the bit punches through the back of the tile. Ease off the pressure at this moment to avoid a blowout on the exit side. After that, you can speed up again to finish the hole into the drywall or backer board behind it.
How to Drill Larger Holes in Tile
Some projects — like installing a shower valve or a new pipe fitting — call for a bigger opening than a standard hole. Here’s how to tackle that.
Method 1: Use a Hole Saw
A carbide-grit hole saw is the fastest, cleanest way to cut a large circular opening in tile. You’ll also need an arbor attachment to connect the hole saw to your drill.
- Mark the center point of your hole.
- Attach the hole saw and arbor to your drill. A center bit on the arbor helps you align the saw precisely with your mark.
- Keep water misting on the area throughout the process to control heat and dust.
- Start at a low speed with light pressure to carve a guide groove.
- Once the saw has a solid bite, slowly increase speed while keeping pressure steady and even until you cut all the way through.
Hole saws aren’t cheap, so this option makes the most sense if you’re tackling multiple holes or plan to reuse the tool down the line.
Method 2: The Drill-and-Tap Technique (No Hole Saw Required)
If buying a hole saw isn’t worth it for a one-time job, try this budget-friendly alternative:
- Trace the outline of your hole onto the tile using a felt-tip pen or grease pencil.
- Using a ¼-inch masonry bit, drill a ring of closely spaced holes all along that outline.
- Gently tap along the ring of holes with a hammer, working your way around the circle.
- Continue tapping the center section patiently — it may take a couple of minutes, but the middle piece will eventually break free.
The resulting edge won’t be perfectly smooth, but a decorative escutcheon plate (the trim ring that fits around pipes and fixtures) will hide any roughness. This same drill-and-tap method also works for cutting square or rectangular openings.
Common Problems and How to Fix Them
Even careful work can hit a snag. Here’s how to handle the most frequent issues.
The Tile Cracked — Now What?
Stop drilling the moment you notice a crack. Small hairline cracks may end up hidden behind the fixture you’re installing, so don’t panic right away. If the crack is more severe or highly visible, you’ll likely need to replace that tile. Going forward, double-check that you’re using the correct bit type and a slow, steady technique to avoid a repeat.
The Bit Keeps Slipping
A slipping bit usually means it’s dull, mismatched to your tile type, or you’re pressing too hard too soon. Make sure your bit is sharp and rated for the tile you’re working with, rely on masking tape or a starter divot for grip, and always begin with light pressure before ramping up.
Cleaning Up After the Job
Once your holes are drilled, vacuum up any leftover dust and debris, then wipe the area down with a damp cloth — this step matters even more if you’re planning to apply adhesive or caulk afterward. Finally, install wall anchors where needed to make sure your new fixture can safely support its weight over time.
Final Thoughts
Drilling through tile isn’t nearly as intimidating as it looks once you know what you’re doing. Identify your tile type, choose the right bit, work slowly, and keep water or tape handy for control — and you’ll get clean, crack-free holes every time. Just remember: safety gear on, patience up, and you’ve got this project covered.
