

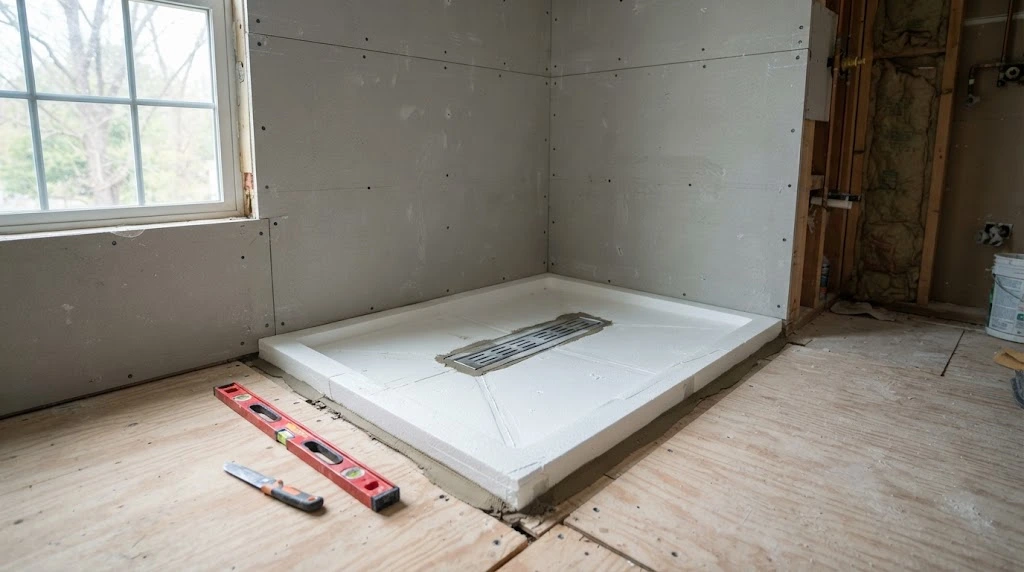
If you’re planning a shower remodel, there’s a good chance you’ve come across the term “presloped shower pan.” It sounds technical, but the idea behind it is simple: it’s the part of your shower that guides water down to the drain, and it comes with the slope already built in at the factory.
In 2026, a presloped shower pan typically costs $500 to $950 for the pan alone. Once you add labor, a drain, and tile, most homeowners end up paying $1,500 to $3,000 for a fully installed shower base. Where you land in that range depends mostly on the pan’s size, the drain style you choose, and whether you install it yourself or hire a pro.
This guide breaks down real 2026 pricing, walks through how these pans work, and shows you exactly how to install one without creating the kind of leak that ruins a subfloor years down the road.
What Is a Presloped Shower Pan?
A presloped shower pan is a factory-made foam base that already has the correct drainage slope molded into it. You place it on the subfloor, connect the drain, and tile directly over the top. There’s no mixing mortar, no hand-troweling a slope, and no waiting several days for a mud bed to cure before you can move on to tiling.
Most pans are made from lightweight, high-density expanded polystyrene (EPS). This foam is rigid enough to support tile and thin-set without adding significant weight to your floor structure. Because the surface is waterproofed at the factory, the pan itself acts as your first real barrier against water reaching the subfloor below.
Compare that to a traditional mud bed. With a mud bed, a tile setter builds the slope by hand using sand-mix mortar over a plastic liner. It’s a proven method, but it’s slower, and the result depends entirely on how precisely the installer pitches the mortar. A presloped pan removes that variable. The slope is molded to a consistent grade at the factory — usually around a 2 percent pitch toward the drain — so every pan performs the same way, regardless of who installs it.
Presloped Shower Pan Pricing in 2026
Pricing for these pans breaks down into two categories: the cost of the pan itself, and the total installed cost once you factor in labor and accessories.
Reported material-only pricing for standard center-drain and linear-drain pans runs $500 to $950. Custom-cut or oversized pans tend to land at the higher end of that range, and sometimes above it.
Industry cost-estimating data backs this up. One widely cited 2026 source puts a fully installed presloped shower pan between roughly $1,536 and $2,967, factoring in labor, standard materials, and typical site prep. Other 2026 remodeling cost data shows a broader replacement range of about $530 to $2,700, which spans everything from a simple tile-over swap to a full custom rebuild. The gap between these figures comes down to scope: one reflects an average job, while the other stretches across the full spectrum from the easiest project to the most complex one.
| Item or Service | Typical Cost Range | What Affects the Price |
|---|---|---|
| Foam presloped pan, material only | $500–$950 | Size, drain type, brand, standard vs. custom |
| Linear drain hardware | $150–$400 | Length, grate finish, tile-insert vs. grate style |
| Waterproofing accessories (sealant, curb, membrane) | $50–$150 | Brand, whether a curb kit is included |
| Professional installation labor | $300–$600 | Local labor rates, demo work, plumbing access |
| Full pan installed (pan + labor) | $1,500–$3,000 | Region, tile choice, whether the drain needs relocating |
| Custom mud bed alternative, installed | $900–$3,500 | Size, tile complexity, benches or niches added |
One cost that catches people off guard is freight. Larger pans — especially anything over 60 inches — often ship via freight carrier rather than standard parcel delivery, which can tack on an extra $75 to $200 depending on where you live. This charge rarely shows up when you’re comparing sticker prices between suppliers online, so it’s worth asking about upfront.
How These Estimates Were Built
These price ranges are based on manufacturer product listings, big-box retail pricing, and current 2026 remodeling cost data. Material pricing reflects standard sizes from major waterproofing brands, cross-checked against retail pricing at large tile and flooring suppliers.
Installed cost ranges account for labor rates, regional differences, and whether the drain needs to be relocated. That said, these are typical-range estimates, not a guaranteed quote for your specific home. Your final price will depend on your contractor, your local market, and the condition of your existing plumbing.
Popular Presloped Shower Pan Sizes and Brands
One of the most widely installed products in this category is a linear presloped shower pan available in four standard sizes: 34 by 66 inches, 38 by 66 inches, 44 by 66 inches, and 50 by 66 inches. These typically include an adhesive/sealant kit and a preformed curb, though the linear drain itself is usually sold separately.
Many manufacturers also offer a center-drain version with a factory-installed drain and waste connection, plus a modular option with cuttable grid lines so you can trim the pan to a custom footprint on-site. These pans are typically made from the same lightweight EPS foam and carry a 100 percent waterproof rating that meets ANSI A118.10 waterproofing standards and IAPMO-PS-46 code approval.
Because these pans are usually part of a larger waterproofing product line, pairing the pan with the matching wall membrane and accessories from the same manufacturer keeps your entire shower system under one warranty. Many brands back qualifying installs with a lifetime tile and stone system warranty — but that coverage typically requires you to use compatible products throughout the whole shower, not just the pan.
How to Install a Presloped Shower Pan: Step-by-Step
1. Check your subfloor. Cement backer board, concrete, exterior-glue plywood, and OSB are all suitable substrates for most presloped pans. Skip particle board or standard interior-grade plywood — they break down over time when exposed to moisture.
2. Dry-fit the pan first. Set the pan in place and confirm the drain lines up with your rough plumbing before you commit to anything. If needed, trim the edges with a utility knife to match your exact shower dimensions. Most foam pans cut cleanly, which is one reason they’re a favorite for retrofits in oddly shaped stalls.
3. Bond the pan to the subfloor. Use the manufacturer’s recommended thin-set or adhesive to secure the pan in place.
4. Connect the drain. Follow the specific installation instructions for your product’s drain assembly.
5. Seal every seam. Pay close attention to where the pan meets the curb and where it meets the wall membrane. This is where the majority of future leaks originate if the sealing step gets rushed or skipped.
6. Let the membrane cure, then tile. Once everything has properly cured, you’re ready to install backer board on the walls and begin tiling.
Common Mistakes That Cause Shower Pan Leaks
The pan itself is rarely the problem. Most leaks trace back to one of these three issues:
- Skipping or mismatching sealant at the seams. The seam between the pan and the drain flange, and the seam where the pan meets the curb or wall membrane, need the manufacturer’s specified sealant. Using an incompatible product from a different brand — or skipping this step entirely — is how small leaks start.
- Cutting the pan before confirming drain location. Always dry-fit and double-check your drain measurements before making any cuts. Moving a drain after the pan is already bonded down often means tearing out cut and set tile to fix it.
- Skipping the flood test. Before you tile, plug the drain and fill the pan with an inch or two of water, then let it sit overnight. If the water level drops, you’ve found a leak while it’s still easy to fix — not after it’s buried under thin-set and grout.
DIY or Hire a Contractor?
A presloped shower pan is genuinely DIY-friendly for a standard-size stall with an accessible drain. If your project fits that description, a confident weekend DIYer with basic tools and a level can usually handle it.
That said, bring in a licensed professional if:
- The drain needs to be relocated (this affects your home’s waste line and often requires a permit)
- You’re building a curbless or barrier-free shower
- You’re working with an oddly shaped stall
- The install is on a second-floor bathroom, where subfloor deflection affects long-term tile performance
Structural and plumbing mistakes get expensive fast, which is why these particular scenarios are worth paying a professional to get right the first time.
Presloped Pans vs. Other Waterproofing Systems
Several manufacturers compete in this space, and it helps to know how they stack up. Some brands offer heavy-duty shower trays rated to support small-format penny tile and loads over 6,000 pounds, available in both four-slope (center drain) and two-slope (linear drain) versions. Other brands offer prefabricated sloped trays in similar dimensions with center or off-center outlet positions.
Most competing products solve the same basic problem using the same core material and a nearly identical installation process. The real differences show up in drain compatibility, curb options, and whether you want your entire shower system covered under one manufacturer’s warranty. If you’re already committed to one brand’s wall membrane, sticking with the matching pan keeps everything under a single warranty umbrella. If you’re building from scratch, it’s worth comparing pricing and availability across brands at your local supplier, since both shift by region.
Frequently Asked Questions
Do I need a linear drain with a presloped shower pan?
No. Most manufacturers sell both center-drain and linear-drain versions of their presloped pans, so you can choose based on your design preference and whether you want a curbless shower. Linear drains tend to work especially well with large-format floor tile in that kind of layout.
Can I cut a presloped shower pan to a custom size?
Yes, within limits. Most foam pans can be trimmed on-site with a utility knife to fit slightly smaller dimensions. You can’t extend a pan beyond its manufactured size, though — if you need a truly custom footprint, order a custom-sized pan directly from the manufacturer or distributor.
How long does a presloped shower pan last compared to a mud bed?
Both can last decades when installed correctly. Longevity depends more on waterproofing quality and installation care than on the base material itself. The real advantage of a presloped pan is consistency — the slope and waterproofing are built at the factory, not dependent on one installer’s technique.
Is a presloped shower pan cheaper than a traditional mud bed?
Usually, yes — mainly because it saves labor time rather than material cost. A mud bed install can run $900 to $3,500 depending on size and complexity, while a presloped pan often lands in a similar or slightly lower range once you factor in the labor a mud bed demands.
What size shower pan do I need?
Measure your existing stall or planned framing in inches, then match it to the closest standard size from your chosen brand. Round down slightly, since most pans can be trimmed to fit but can’t be extended.
Final Takeaway
A presloped shower pan runs $500 to $950 for the material, and $1,500 to $3,000 for a full professional install. Where you land depends on size, drain type, and whether you tackle the project yourself.
Whatever route you take, the sequence matters more than the brand you pick: confirm your drain location before cutting anything, seal every seam with the manufacturer’s own product, and flood-test before you tile. Get those three things right, and your shower has a real shot at staying dry for the next twenty years.
