

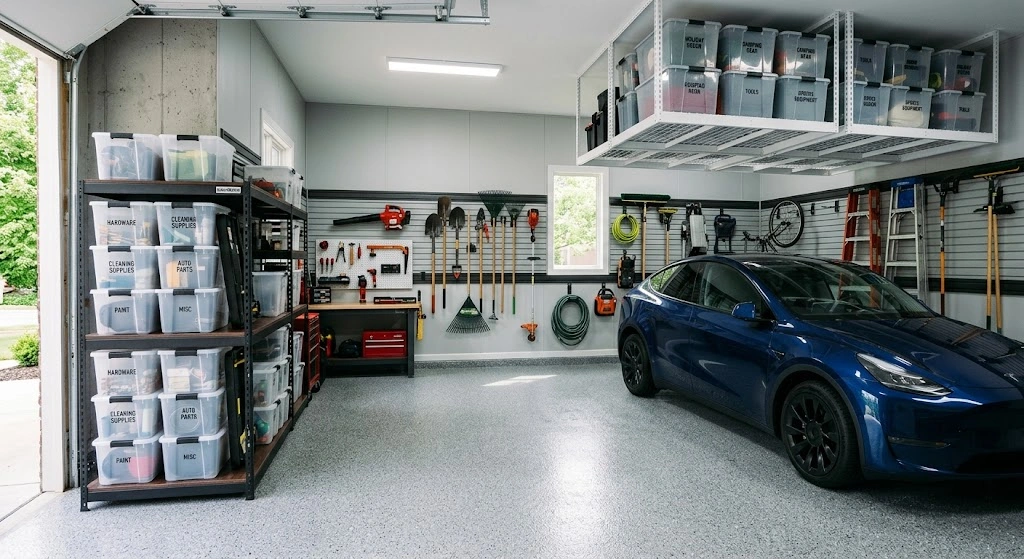
The garage is one of the most versatile spaces in any home, yet it is frequently the most neglected. Over time, it easily turns into a chaotic dumping ground for forgotten cardboard boxes, outgrown sports gear, dusty holiday decorations, lawnmowers, and misplaced power tools. Before long, there is no longer room to park your vehicles inside—leaving your cars exposed to harsh weather while valuable floor space goes to waste.
Organizing a messy garage may feel like an overwhelming task, but with a systematic approach, smart zoning strategies, and vertical wall-and-ceiling storage solutions, you can completely reclaim your space in just a single weekend.
Step 1: The Ultimate Garage Sorting and Decluttering Process
Attempting to organize a garage while keeping every item currently stored inside is nearly impossible. Real, lasting organization requires a clean slate.
1. The Full Garage Empty-Out
Choose a clear, dry weekend day. Pull every single item out of your garage and spread it across your driveway or lawn. Emptying the garage completely exposes all available floor, wall, and ceiling space while allowing you to sweep out years of accumulated dust, dirt, cobwebs, and debris.
2. The 4-Category Sorting Framework
Sort every item on your driveway into four distinct piles:
- Keep: Items used regularly (tools, seasonal gear, sports equipment, lawn care tools).
- Donate/Sell: Functioning items that have not been touched in over 12 months (old bicycles, redundant power tools, outgrown toys).
- Trash/Recycle: Broken gear, dried-up paint cans, expired lawn chemicals, rusted hardware, and crushed cardboard.
- Relocate: Items that do not belong in a garage due to temperature fluctuations or moisture damage (such as delicate paper photographs, propane tanks, or uncanned food items).
3. What NEVER to Store in a Garage
- Propane Tanks: Leaking gas can accumulate in enclosed spaces and ignite from water heater or vehicle sparks. Keep tanks outdoors.
- Paper Cardboard Boxes: Moisture causes cardboard to degrade, attracting pests like silverfish, mice, and termites. Replace cardboard boxes with sealed plastic storage totes.
- Paint Cans: Extreme summer heat and freezing winter temperatures alter paint chemistry, rendering it unusable. Store leftover paint in a temperature-controlled closet.
Step 2: Establish Functional Garage Storage Zones
To maintain long-term order, group similar items together into dedicated functional zones throughout the garage layout.
Zone Layout Blueprint:
- Zone 1 (Everyday Transition Area): Located right next to the house entrance door. Store daily essentials like coats, boots, umbrellas, and dog leashes.
- Zone 2 (Easy Access / Bulk Items): Place frequently used items like recycling bins, paper towels, and extra pantry dry goods near the garage entrance.
- Zone 3 (Tall & Long Handle Tools): Mount long-handled lawn tools (rakes, shovels, brooms, string trimmers) vertically on side walls using wall tracks or pegboards.
- Zone 4 (Workstation & Power Tools): Set up a heavy-duty workbench equipped with pegboards, small-parts bin organizers, and task lighting for home DIY projects.
- Zone 5 (Sports & Kids Equipment): Dedicate lower wall space or open wire bins near the main garage door for sports balls, helmets, bikes, and lawn games so kids can put items away easily.
- Zone 6 (Seasonal & Rare Items): Store holiday decorations, camping gear, and seasonal items high up on ceiling racks or top shelves.
Step 3: Utilize Vertical Wall Storage Systems
Floor space is premium real estate—the key to a spacious garage is getting as many items as possible up off the concrete floor and onto the walls.
1. Slatwall and Heavy-Duty Track Systems
Install horizontal PVC slatwalls or steel track rail systems (such as Rubbermaid FastTrack or Gladiator GearTrack) directly across wall studs. These systems feature interchangeable hooks, baskets, and shelving brackets that slide along tracks, allowing you to reconfigure storage layout effortlessly as your needs change.
2. Steel Heavy-Duty Pegboards
While traditional hardboard pegboards warp under heavy weight or high humidity, metal pegboard panels support heavy power tools, extension cords, saws, and wrenches without sagging. Hang clear bin cups on pegboard hooks to hold loose nails, screws, and hardware.
Step 4: Maximize Overhead Ceiling Storage
The empty vertical air space beneath your garage ceiling is ideal for storing bulky, lightweight, or infrequently used seasonal items.
1. Installing Overhead Steel Ceiling Racks
Mount heavy-duty steel wire ceiling racks (such as 4×8-foot suspended racks) directly into ceiling joists using heavy lag bolts. Overhead racks hold up to 300 to 600 pounds of weight—making them perfect for storing holiday light tubs, artificial Christmas trees, camping tents, and seasonal outdoor cushions.
2. DIY Ceiling Sliding Tote Rails
Build a custom ceiling tote storage channel using 2×4 lumber and plywood strips screwed into ceiling joists. The top lips of plastic storage totes slide smoothly along the wooden channels, elevating storage bins completely out of sight.
Step 5: Build Sturdy DIY Wooden Storage Shelves
Off-the-shelf plastic shelving units often bow or break under heavy paint cans or toolboxes. Building custom wooden shelves using 2×4 framing and 3/4-inch plywood provides massive load capacity for minimal cost.
DIY Heavy-Duty Shelf Framing Steps:
- Locate Wall Studs: Use a stud finder to mark stud centers along your target garage wall.
- Mount Wall Cleats: Screw horizontal 2×4 support cleats directly into wall studs at your desired shelf heights using 3.5-inch structural wood screws.
- Build Shelf Frames: Construct rectangular outer frames using 2x4s, adding middle cross-braces every 24 inches for rigidity.
- Attach Plywood Surfaces: Screw 3/4-inch CDX exterior-grade plywood sheets on top of the 2×4 frames.
- Add Front Support Legs: Secure vertical 2×4 support posts from the front corners of shelves down to the concrete floor to transfer structural weight safely.
Step 6: Floor Cleaning and Protective Epoxy Coatings
Once walls and ceilings are fully organized, finish your transformation by upgrading the bare concrete floor.
1. Deep Cleaning Concrete
Scrub oil stains and tire marks using an industrial degreaser or stiff wire brush paired with (TSP). Hose down the floor and let it dry completely.
2. Applying DIY Epoxy Floor Paint
- Etch the Concrete: Apply a citric or muriatic acid wash solution to etch the concrete surface, creating a rough texture that allows paint to bond.
- Roll 2-Part Epoxy Coating: Apply a durable 2-part epoxy garage floor paint (such as Rust-Oleum EpoxyShield). Toss decorative vinyl color flakes over the wet epoxy, then seal with a clear acrylic topcoat once dry.
- Benefits: Epoxy seals concrete against salt, oil, and moisture stains while creating a bright, showroom-style reflective finish that is effortless to sweep.
Quick Reference Summary Checklist
- Empty the entire garage onto your driveway to sort items into Keep, Donate, Trash, and Relocate piles.
- Replace moisture-absorbing cardboard boxes with clear, airtight plastic storage totes.
- Create dedicated functional zones for sports gear, lawn tools, transition items, and seasonal storage.
- Get items off the floor using wall tracks, pegboards, and heavy-duty 2×4 wooden shelves.
- Utilize unused ceiling height by installing suspended steel overhead ceiling racks.
- Apply a 2-part epoxy coating on concrete floors to prevent oil stains and simplify cleaning.
Final Thoughts
Organizing your garage is an investment that pays immediate dividends in daily convenience, safety, and functional home square footage. By clearing floor clutter, maximizing vertical wall space, utilizing overhead ceiling storage, and establishing dedicated zones, you transform a dusty junk vault into a clean, highly efficient, showroom-ready extension of your home.
