
")
To repair a PVC pipe, start by turning off the water supply and drying the damaged area. For minor leaks, apply epoxy putty or self-fusing silicone tape. For larger cracks or breaks, cut out the damaged section and use a slip coupling with PVC primer and cement for a permanent, watertight fix.
A dripping PVC pipe can feel like a disaster, but in most cases, it’s a problem you can fix yourself in under an hour. Knowing how to repair PVC pipes is one of the most useful home skills you can have — and you don’t need to be a plumber to do it right.
Whether you’re dealing with a hairline crack under the sink, a leaky joint in your irrigation line, or a burst section in a wall, this guide walks you through every method from the simplest tape fix to a full pipe replacement.
Why PVC Pipes Crack and Leak
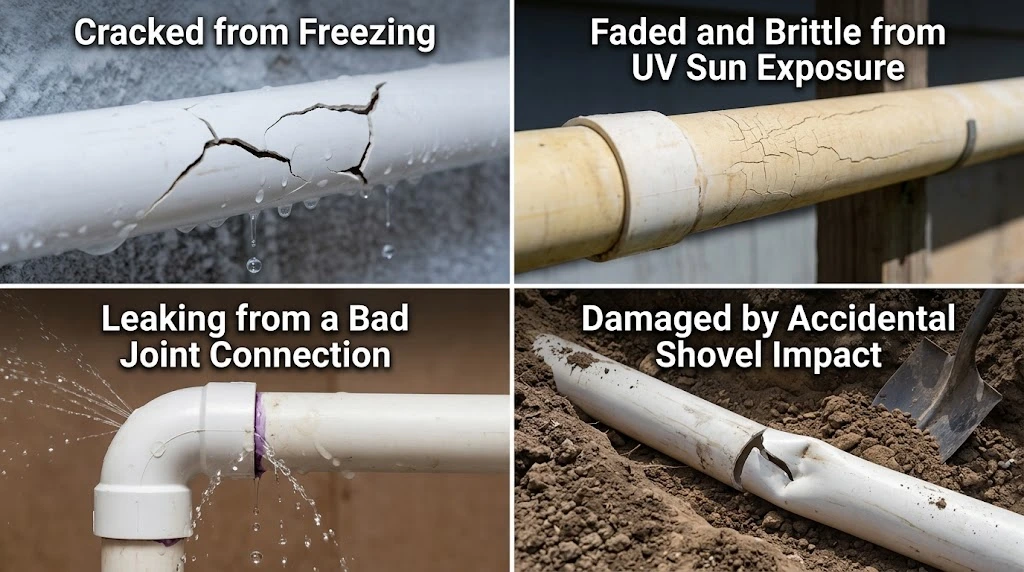
Before you grab a roll of tape, it helps to understand what went wrong in the first place. Improper installation is one common cause — fittings that aren’t properly secured or aligned allow water to escape over time. Using the wrong type of adhesive glue is another frequent culprit, leading to premature joint failure.
Freezing temperatures are particularly tough on PVC. When water inside a pipe freezes, it can exert enormous internal pressure — up to 25,000 PSI — causing the pipe to crack or burst. If you live in a colder climate, pipes near exterior walls are the most vulnerable.
Age and UV exposure also weaken PVC over time, making older pipes more prone to cracking under normal water pressure. And sometimes, a pipe breaks simply because someone accidentally drove a shovel or drill into it during yard work or renovations.
Knowing the cause matters because it tells you whether a quick patch will hold long-term or whether you need to do a full section replacement.
How to Spot a Leak Before It Gets Worse
Catching a leak early saves you from water damage, mold, and expensive repairs. A musty or moldy smell that lingers around cabinets or walls is often the first sign of a hidden slow leak. Dark stains, peeling paint, or visible mold near pipes are also red flags worth investigating.
If you notice water pooling near a pipe or moisture forming on the outside of the pipe itself, run the faucet and watch closely to see whether the moisture increases with water flow. That simple test usually confirms a leak quickly.
For underground or hard-to-reach pipes, a sudden spike in your water bill without a clear reason is often the clearest sign something is wrong.
What Tools and Materials You’ll Need
You don’t need a fully stocked plumber’s van to handle most PVC repairs. The basics include a PVC pipe cutter or hacksaw, sandpaper and a clean cloth, PVC primer and cement, and pipe repair couplings or slip-fix fittings.
For quick temporary fixes, pick up self-fusing silicone repair tape, two-part epoxy putty, or fiberglass resin tape from your local hardware store. These materials are inexpensive and widely available.
Having a bucket and a few dry towels nearby is always smart — even after you shut the water off, there’s usually some left in the line.
Method 1: Self-Fusing Silicone Repair Tape
This is your go-to emergency fix when you need to stop a drip fast and don’t have time for anything else. Silicone repair tape stretches tightly around the pipe and bonds to itself, creating a waterproof barrier without any adhesive.
Clean and dry the leaking area thoroughly first. Then wrap the tape tightly around the pipe, covering a couple of inches beyond each side of the leak. Press firmly as you wrap to make sure it seals completely.
This method works best on straight pipe sections with small leaks. It’s not a permanent fix, but it buys you time to source the right parts for a more lasting repair.
Method 2: Epoxy Putty for Small Cracks and Holes
Epoxy putty is one of the most reliable options for minor PVC damage. It comes in two parts — once you mix them together, the material becomes moldable like putty and bonds directly to the PVC, forming a completely waterproof seal.
Start with a dry pipe — drain the line and let the surface dry completely before you begin. Lightly sand the damaged section to give the epoxy something to grip, then mix the two parts according to the manufacturer’s directions.
Press the mixed epoxy firmly over the leak, making sure there are no gaps or air pockets. Most products cure in around 20 to 25 minutes, after which you can slowly turn the water back on and check for any remaining drips.
Epoxy works well on small holes and surface cracks. For longer splits or damage at pipe joints, you’ll want to move on to one of the more permanent methods below.
Method 3: Fiberglass Resin Tape for a Stronger Patch
Fiberglass repair tape is a step up from silicone tape in terms of durability. It uses a water-activated resin that hardens around the pipe, creating a firm, pressure-resistant shell over the damaged area.
After cleaning and drying the pipe, cut a length of fiberglass tape long enough to cover the damaged area. Wet the tape to activate the resin, then wrap it tightly around the pipe. Secure it with tape and allow it to cure for 15 to 30 minutes before turning the water flow back on.
When applied correctly, fiberglass tape can hold up for several months or even years, making it a practical solution when cutting into the pipe isn’t an option.
Method 4: Rubber Patch and Hose Clamps
If you need a fast fix with materials you may already have around the house, a rubber patch and hose clamps can seal a small leak without any specialty products.
Cut a piece of rubber large enough to cover the crack, then position it directly over the damaged area. Slide worm-gear hose clamps over the pipe — one on each side of the crack — and tighten them until the rubber is fully compressed against the pipe surface.
This method works best on smooth, straight sections of pipe and isn’t ideal near joints or fittings where the pipe surface is irregular. It’s a trustworthy temporary solution, though the rubber and clamps will eventually become less effective as the leak worsens.
Method 5: Slip Coupling — The Permanent Fix for How to Repair PVC Pipes
When the damage is too extensive for a patch, or when you want a truly long-lasting repair, a slip coupling is the right tool for the job. This involves cutting out the damaged section and gluing in a replacement piece of pipe.
Start by making sure the pipe is completely empty. Locate the damaged area and use a hacksaw to cut straight through the pipe on each side of the leak. Then lightly sand both ends of the remaining pipe as well as the inside of the slip coupling.
Apply PVC primer to the outside of the pipe ends and the inside of the coupling. Follow that immediately with PVC cement on the same surfaces, then push the pieces together with a slight twisting motion to spread the cement evenly. Hold everything in place for about 30 seconds while the cement begins to bond.
Give the cement 15 to 30 minutes to cure fully before turning the water back on. This creates a bond that’s just as strong as the original pipe and should last for many years without issue.
How to Replace a Full Section of Damaged PVC Pipe
Sometimes the damage goes beyond what a single coupling can handle — long splits, multiple cracks, or a badly warped section all call for a full replacement.
Turn off the water at the main valve and open a faucet to drain any water remaining in the line. Inspect the pipe carefully to identify the full extent of the damage, then mark the section to be removed.
Use a PVC cutter for clean, straight cuts. A hacksaw works too, but you’ll need to smooth the edges with sandpaper afterward to remove any burrs that could prevent a tight seal.
Measure the gap, cut a new length of PVC pipe to fit, and dry-fit everything before applying any cement. When you’re satisfied with the fit, prime and cement all connection points, assemble the pieces, and hold them steady for at least 30 seconds.
Always dry-fit before gluing. PVC cement sets quickly and there’s no undoing a misaligned connection once it’s made.
Common Mistakes to Avoid
Even experienced DIYers can slip up when repairing PVC. One of the biggest mistakes is working on a wet pipe — most repair methods, especially epoxy and cement, won’t bond properly unless the surface is completely dry.
Using the wrong PVC cement is another common error. Not all pipe adhesives are created equal, and using a glue that isn’t formulated for PVC will result in a weak joint that fails prematurely.
Skipping the primer is a mistake too. PVC primer chemically softens the pipe surface so the cement can form a true molecular bond. Without it, you’re relying on surface adhesion alone, which isn’t nearly as strong.
And finally, don’t overtighten slip nuts at joints. Too much force on slip nuts can cause them to crack and create new leaks, which is the opposite of what you’re trying to achieve.
When to Call a Professional Plumber
Most PVC repairs are well within a confident homeowner’s skill set, but there are situations where calling a pro is the smarter move.
Leaks in hard-to-reach areas, damage to main water lines or sewer pipes, and situations where you’re unsure of the full extent of the damage all warrant professional attention. Local building codes may also require a licensed plumber for certain types of pipe work.
If you’ve attempted a repair and the leak keeps coming back, that’s also a sign that something larger is going on — a plumber can diagnose underlying issues that aren’t obvious on the surface.
Preventing Future PVC Pipe Damage
Once you’ve made the repair, a few simple habits can help your pipes stay in good shape for years.
Insulating outdoor and exposed pipes before winter is one of the most effective things you can do. Allowing a faucet to drip slightly during extreme cold snaps relieves internal pressure and can prevent a catastrophic burst.
Check under sinks and around visible pipe connections a couple of times a year. Catching a small drip before it becomes a significant leak takes just a few minutes and can save you from costly water damage repairs.
If your home has older PVC pipes that were installed decades ago, a plumber can assess whether they’re at risk and recommend proactive replacements before problems arise.
Conclusion
Repairing PVC pipes is one of those home skills that feels intimidating until you actually do it — and then it feels remarkably straightforward. Whether you’re reaching for silicone tape for a quick emergency fix or breaking out the PVC cement for a permanent slip coupling repair, the process is manageable, affordable, and deeply satisfying.
The key is matching the right method to the severity of the damage. Small cracks and slow drips can often be handled with tape or epoxy in minutes. Larger breaks or recurring leaks call for cutting out the damaged section and replacing it properly.
Either way, you now have everything you need to handle the job with confidence. Shut off the water, dry the pipe, and get to work — your pipes aren’t as fragile as that first drip made them seem.