
")
To fix a bathroom sink stopper, check under the sink for the pivot rod and clevis strap. Loosen the spring clip, reposition the pivot rod to a higher or lower hole on the strap, and tighten. This simple adjustment fixes most stopper issues. If the stopper is damaged or corroded, replace the entire pop-up assembly.
A bathroom sink stopper that won’t stay up, won’t go down, or just sits there leaking water is genuinely annoying — but it’s one of those repairs you can almost always handle yourself. Knowing how to fix a bathroom sink stopper means you won’t need to call a plumber for something that usually takes under an hour and costs next to nothing.
In most cases, the issue comes down to a misaligned rod, a clogged drain, or a worn-out part. This guide walks you through everything: diagnosing the problem, adjusting the assembly, cleaning the stopper, and replacing it if needed.
Understanding How a Bathroom Sink Stopper Works
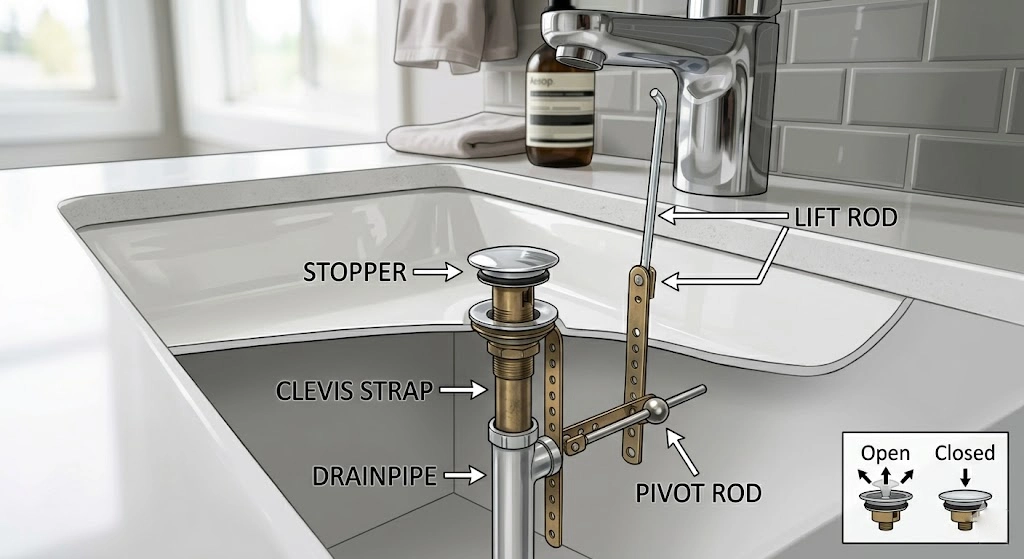
Before you start turning wrenches, it helps to understand what you’re working with. Most bathroom sinks use what’s called a pop-up drain assembly. It looks simple from the top — just a plug in the drain — but underneath the sink, several parts connect to make it move.
The lift rod is that small metal rod sitting behind your faucet. When you pull it up, it tugs on a horizontal rod called the pivot rod (or pop-up lever), which passes through the side of the drainpipe and connects to the bottom of the stopper. In between, a metal strap called the clevis strap links the lift rod to the pivot rod, and a spring clip holds everything in place.
When one of these parts slips, rusts, or breaks, the stopper stops behaving. Now let’s figure out which part is causing your problem.
Common Reasons a Bathroom Sink Stopper Stops Working
Most stopper problems fall into one of four categories. The stopper might be out of alignment, clogged with hair and soap scum, loose because a screw or clip has shifted, or physically damaged and in need of replacement.
A stopper that won’t close all the way usually means the pivot rod is sitting too low on the clevis strap. A stopper that won’t open enough to drain properly means it’s positioned too high. If the stopper moves fine but water drains slowly, the problem is likely a buildup of debris around the stopper itself.
When the stopper feels loose, wiggles, or falls completely out of the drain, there’s a good chance the pivot rod has slipped out of the ball joint inside the tailpiece, or the nut holding the pivot rod in place has loosened over time.
Tools You’ll Need to Fix a Bathroom Sink Stopper
You don’t need much for this job. Most fixes only require a few basic items you likely already have at home.
- Adjustable pliers
- Flathead screwdriver
- Small cleaning brush
- Bucket or towel
- Replacement stopper (if needed)
- Plumber’s putty (if reseating)
Having a small container nearby to catch parts as you remove them is a smart move. The spring clip and small nuts are easy to lose on a bathroom floor.
How to Fix a Bathroom Sink Stopper: Step-by-Step
Step 1
Clear out under the sink
Open the cabinet beneath your sink and move anything stored there. You’ll need room to crouch and work comfortably. Place a small towel under the drainpipe in case any water drips when you loosen connections.
Step 2
Remove the stopper
Many pop-up stoppers can be lifted straight out of the drain. Try lifting it and turning it counterclockwise at the same time — it may unscrew. If it doesn’t come out that way, head under the sink and look for a horizontal rod entering the side of the drainpipe. Use your pliers to unscrew the nut holding the pivot rod in place, then pull the rod out. This releases the stopper from below, and you can lift it out freely from above.
Step 3
Clean the stopper and drain opening
Once the stopper is out, you’ll likely find a matted ring of hair, soap, and grime sitting around it. Use your small brush and some dish soap to scrub the stopper thoroughly, paying close attention to the rubber gasket at the bottom. While you have access to the open drain, use a pipe brush or a paper towel to clean out any buildup inside the drain opening itself. This step alone often restores full drainage speed.
Step 4
Adjust the pivot rod position
This is the fix for a stopper that won’t close fully or won’t open enough. Under the sink, find the clevis strap — a flat metal bar with several holes running down its length. The pivot rod passes through one of these holes and is held in place by a small spring clip. Squeeze the spring clip and slide it off, then move the pivot rod to a different hole. Moving it to a lower hole on the clevis strap makes the stopper rise higher (better for draining). Moving it to a higher hole makes the stopper drop lower and seal more tightly. Snap the spring clip back into place once you find the right position.
Step 5
Reinsert the stopper and test
Drop the stopper back into the drain with the small slot or hole at its base facing toward the back wall — that’s where the pivot rod will pass through it. Slide the pivot rod back in through the drainpipe wall, through the hole at the base of the stopper, and hand-tighten the nut. Don’t overtighten or you’ll crack the assembly. Pull the lift rod up and down a few times to test. The stopper should close with a snug seal and open smoothly to drain.
Pro Tip
If there’s a slow drip at the pivot rod nut even after tightening, the rubber washer inside the fitting has worn out. Most hardware stores sell replacement washers for under a dollar — it’s worth swapping it while you already have everything apart.
When to Replace the Entire Pop-Up Assembly
Sometimes adjusting and cleaning isn’t enough. If the stopper stem is cracked, the pivot rod is rusted through, or the rubber gasket has deteriorated past the point of sealing, it’s time to replace the whole assembly.
The good news is that a complete pop-up drain assembly typically costs between $15 and $40 at any hardware store and takes about the same amount of time to install as adjusting the old one. When shopping for a replacement, look for one that matches the diameter of your existing drain opening — most bathroom sinks use a 1.25-inch drain.
How to install a replacement assembly
Start by turning off the water supply valves under the sink and clearing the P-trap area if needed. Remove the old assembly by loosening the large mounting nut beneath the sink basin with your adjustable pliers. Apply a rope of fresh plumber’s putty around the underside of the new drain flange, press it into the drain opening from above, and thread the new mounting nut from below until snug. Attach the tailpiece, reconnect the pivot rod to the new stopper (with the hole in the stopper base facing the back wall), thread it through the clevis strap, and snap the spring clip back on. Connect the lift rod at the top and test everything before turning the water back on.
Run the water and watch all the connections for drips. If you see a leak at the drain flange, the plumber’s putty may need to be reseated. A leak at the pivot rod nut just needs a gentle quarter-turn tightening.
Other Types of Bathroom Sink Stoppers
Not every bathroom sink uses a traditional pop-up assembly. You might have a lift-and-turn stopper, which unscrews from the drain by turning counterclockwise while you lift. These are simple to remove and clean, and if the stopper won’t seal, replacing the rubber gasket at the base usually solves it.
Flip-top stoppers have a small hinged disc on top that rotates to open or close. When these fail, it’s usually because the internal hinge or gasket has worn out — replacing the whole unit is easier than trying to repair individual parts.
Click-clack (or push-pull) stoppers work with a spring mechanism that engages each time you push down. If this type stops clicking, the spring inside has likely failed. These can sometimes be tightened by turning the knob on top clockwise, but replacement is often the cleaner fix.
Keeping Your Sink Stopper Working Longer
A little routine maintenance goes a long way. Pulling the stopper out every month or two and giving it a quick clean prevents the hair and soap buildup that causes most stopper problems in the first place. When you notice the stopper getting sluggish or the drain running slowly, that’s your signal to do a quick adjustment before a small problem becomes a bigger one.
Avoid using harsh chemical drain cleaners regularly — they can degrade rubber gaskets and corrode the metal parts of the assembly faster than normal wear would. A simple baking soda and hot water rinse works well for routine maintenance without damaging any components.
The Bottom Line
Fixing a bathroom sink stopper is one of those DIY repairs that feels intimidating until you’ve done it once. Most problems trace back to a simple rod adjustment, a quick clean, or a cheap replacement part. With a pair of pliers and twenty minutes, you can have your stopper working like new without spending money on a service call.
If you’ve worked through all of these steps and your stopper still isn’t behaving — or if you notice persistent leaks, strange sounds from the drain, or foul odors that cleaning doesn’t solve — those are signs of a deeper plumbing issue worth having a licensed plumber take a look at.